
Anyone that’s interested in learning about computers or the internet will love experimenting with a Raspberry Pi. The only issue is that it doesn’t come with a monitor or keyboard. This actually isn’t a problem though, because there’s a way to setup and work on the Pi without ever connecting it to a monitor or keyboard. It’s known as running the Pi “headless”.

In this tutorial, I’ll walk you through the steps of setting up a Raspberry Pi without a monitor and keyboard on a new installation of Raspbian. All you need is another computer with internet access, an SD card adapter, ethernet cable, and access to the internet router on the network you want to connect to.
Here’s a video showing the steps, but read below for the details:
Gather all the Pieces
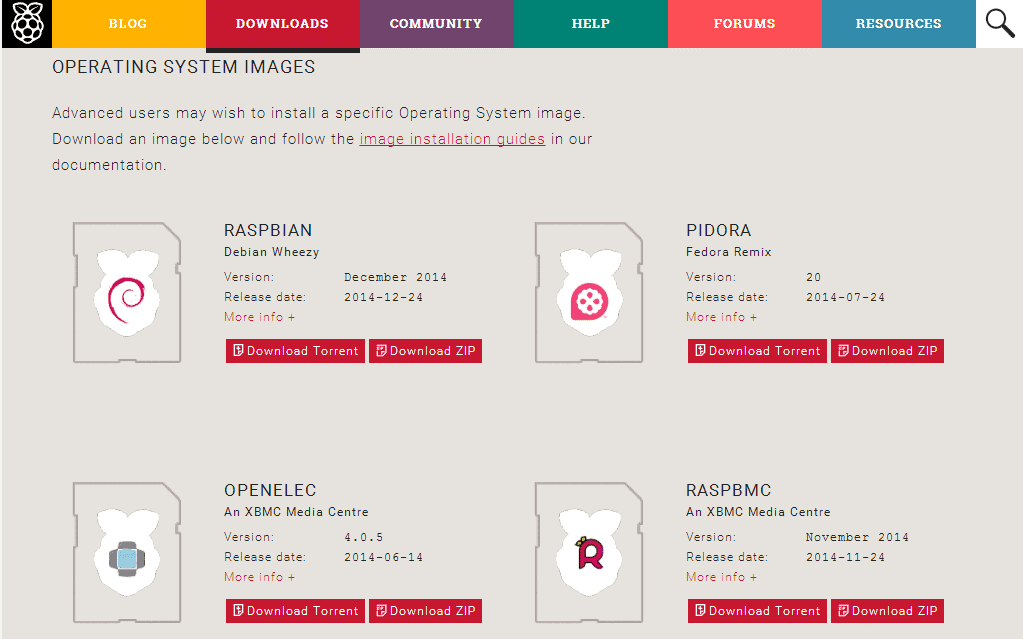
The first step is to download the Raspberry Pi’s operating system. I’ll be using Raspbian Jessie Lite in this tutorial. You can download it here from the Raspberry Pi Foundation.
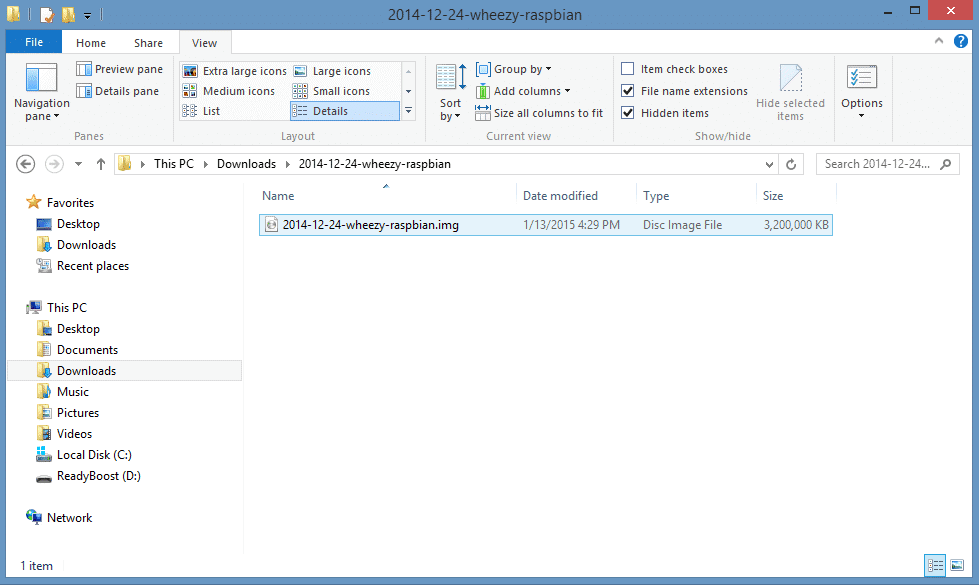
Just download the ZIP file and Extract it to a new folder. Then you’ll have a single .img image file that contains the operating system:
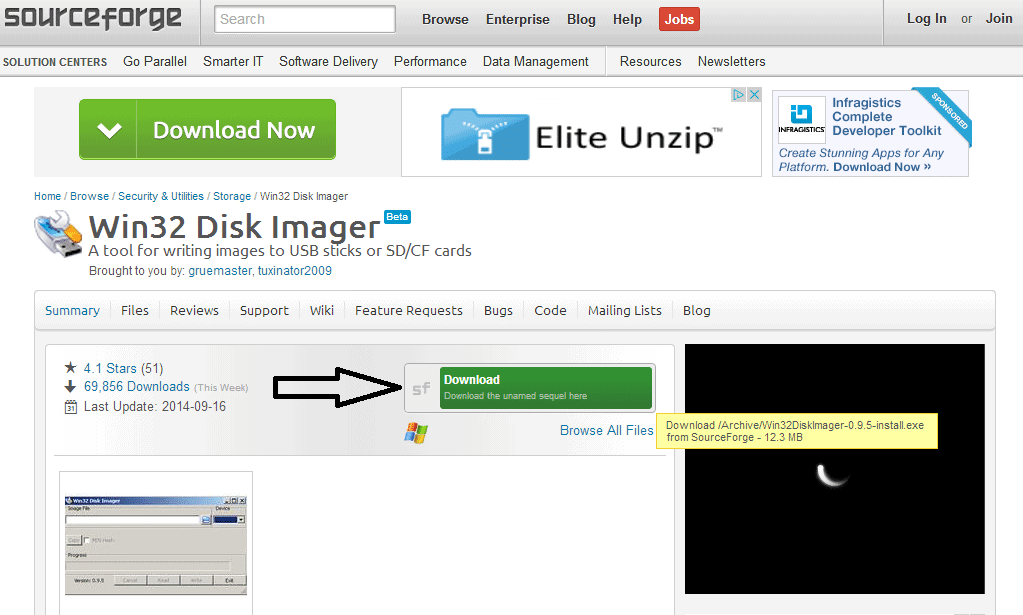
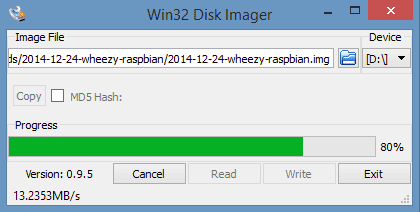
Next we’ll need a program that can write the operating system image file onto a microSD card. We’ll use Win32DiskImager to do that, so download and install it:
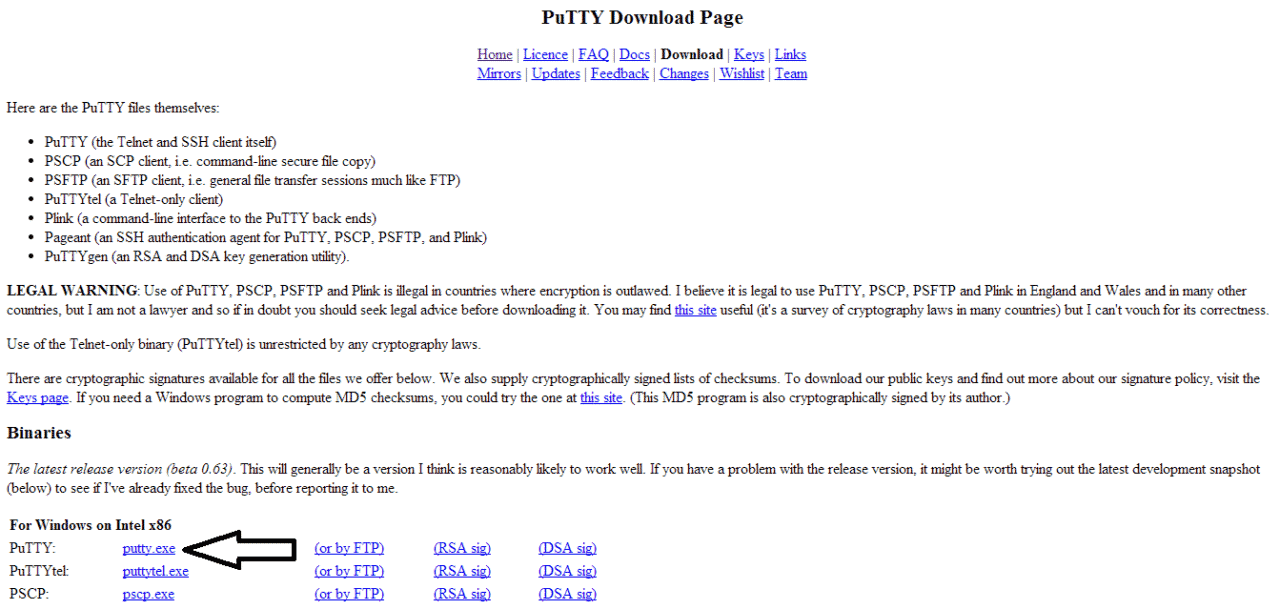
Now we need a way to access the Raspberry Pi’s command prompt. We can do this with a remote SSH client called PuTTY. PuTTY establishes an SSH connection between the Raspberry Pi and another computer. It opens up a window that gives you access to the Raspberry Pi’s command prompt. Download and install PuTTY to your PC.
If you’re using a Mac, you can SSH into the Pi with Terminal. Click here for good tutorial on SSHing via Terminal.
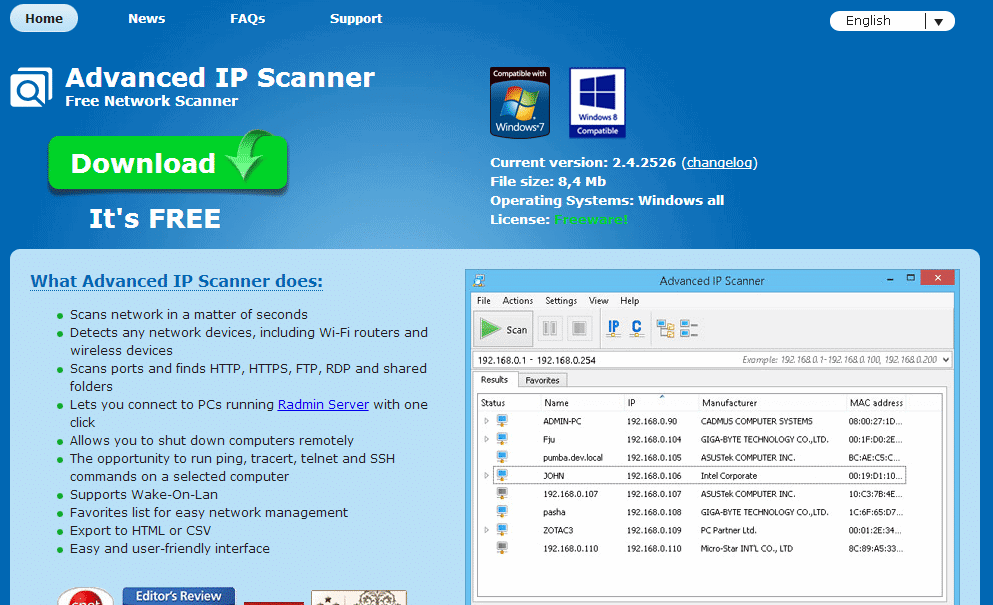
We’ll also need a way to find the local IP address of your Raspberry Pi when it’s connected to your router via the ethernet cable. There are lots of ways to do this, but Advanced IP Scanner is pretty easy to use. It will scan your home network and list all connected devices and their local IP addresses.
Another way to find your Pi’s local IP address is to log into your router’s configuration page and get a list of the connected devices. But you need to know your router’s username and password to access it. If you want to do it this way, find the router’s product number on the back, then search online for the user manual. There should be instructions on how to access the router’s configuration page and how to view the connected devices.
Write the Raspian Operating System to the microSD Card
Now that we have everything we need, let’s write the operating system image to the microSD card.
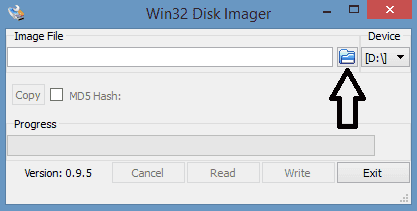
Insert a blank microSD card into your computer using the SD card adapter. Then open Win32DiskImager, and select the operating system image file that was extracted earlier by clicking on the little folder icon:
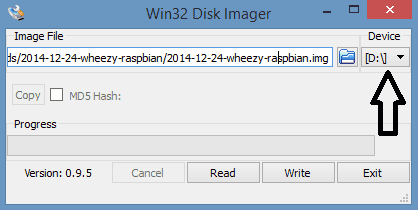
Next, select the drive that has the microSD card from the drop-down list below “Device”:
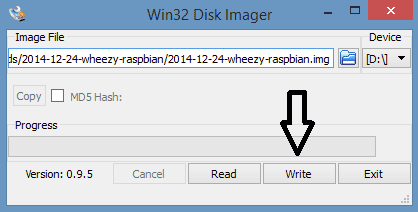
Now click “Write” on the bottom of the window. This will take from 1 to 15 minutes depending on your computer and the size of your microSD card:
Wait for the process to complete:
If you’re using a version of Raspbian released after November 2016, there is one extra step:
SSH was disabled by default in Raspbian versions released after November 2016. One way to enable it is to access the raspi-config menu and turn it on. However, we’re setting it up headless so we don’t have access to the command prompt yet. Luckily there’s another way to turn on SSH…
All you need to do is create an empty file called “SSH” and place it in the root partition of the SD card. The file should have no extensions like “.txt” or “.doc”. The easiest way to do this is to open up a text editor like Notepad and save the blank page as “SSH.txt”. Close the text editor, then rename the file to delete the “.txt” extension. After that, move the file to the top level folder of the SD card (the root partition).
Now you can eject the SD card from your computer and insert it into your Pi.
Establish an SSH Connection to your Raspberry Pi
Connect the Pi to your internet router with an ethernet cable, then plug in the power cord so it boots up.
Now we need to find out the local IP address your router has assigned to the Pi. Open up Advanced IP Scanner and click “Scan” in the upper left hand area of the window. A list of the connected devices and their local IP addresses will be generated:

Write down the IP address for the device that says Raspberry Pi Foundation in the “Manufacturer” column. In my case it’s 10.0.0.105.
Now it’s time to connect to the Pi. Open up PuTTY, and enter the local IP address into the “Host Name” field:
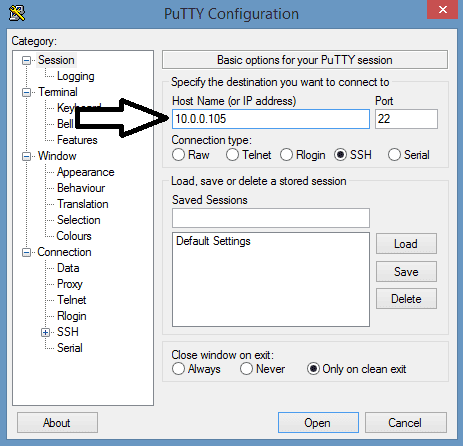
Now click “Open” to initiate the connection.
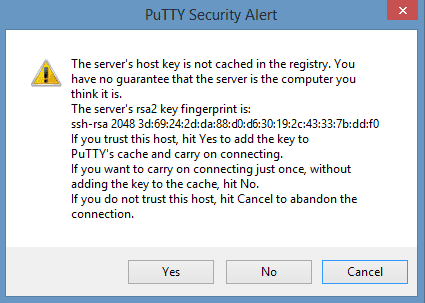
On the first connection attempt, a security warning will appear. Just press “Yes” since you’re connecting to your own Pi:
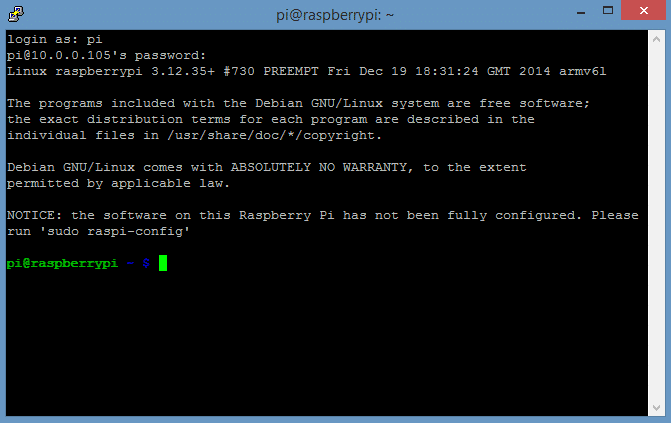
If the SSH connection is successful you’ll be greeted with the login prompt of your Raspberry Pi:
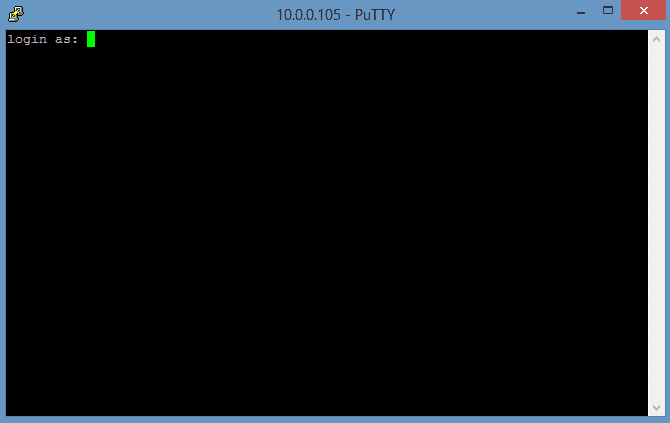
If this is your first login and you haven’t changed the username or password yet, enter pi for the username, and raspberry as the password.
Now you’re logged in to your Raspberry Pi via SSH:
At this point, it’s a good idea to configure your Raspberry Pi by entering sudo raspi-config to enter the configuration settings menu:

This is where you can change all of the default settings for Raspbian, and do other useful tasks like expand the file system and overclock the processor.
Now that SSH is set up, the next step is setting up WiFi and establishing a remote desktop connection so you can access the Pi’s desktop environment. This tutorial will walk you through that:
How to Set Up WiFi on the Raspberry Pi
If you have any questions about this post, or are having issues setting up your Raspberry Pi over SSH, please leave a comment below and I’ll try to answer it! And don’t forget to subscribe to get an email when we publish new tutorials. Thanks for reading!


So to summarize all
1. Download Raspbian
2. Download Disk32Imager
3. Download Putty
4. Download advanced IP scanner.
5. Write Raspbian OS on SD card using diskimager
6. Connect Pi with router using Ethernet cable
7. Power up the Pi
8. Use advanced IP scanner to find IP of Pi
9. Open Putty and enter IP
10. Enter username and password
11. Configure Raspbian.
Done.
Thank You for great write up. Will comeback once I actually start doing it.
To save ssh file simply make file in notepad etc and save as ssh and in file type click all files and it will be saved without any extension.
thank you, this is a wonderful post, i could login to my raspberry Pi 2, in 10 min.. ( ofcourse, I have apreconfig memory card),.thanks, will look for your other posts
hi, I followed your tutorial but could not get to Pi GUI
Hi Victor, to access the GUI just follow the steps in this artice: https://circuitbasics.com/Staging/access-raspberry-pi-desktop-remote-connection/
You got it, thats all there is to it… Thanks, glad you found it helpful
There is no need to use advanced IP scanner.
ping raspberrypi
ping raspberrypi.local
ping raspberrypi.lan
will do the job for the majority of home network installations. Alternatively, Raspberry Pi’s IP address can be spotted via home router’s web interface
Hi, I did it as manmeet summary above. But to get to Pi GUI?
SSH can only access the command line. To get to the Raspbian desktop, you’ll need to use a remote desktop app. Check out this article to see how to set it up: https://circuitbasics.com/Staging/access-raspberry-pi-desktop-remote-connection/
Hey!! In which directory should the ssh file be pasted?
I followed your instructions and was able to connect my Pi. But when I tried to do the same the next day, I couldn’t connect through PuTTY. The error says connection timed out. Please help.
Hey sheelbrat, just make sure that you have enabled the SSH from Raspberry-pi configuration preferences or do the alternatives from this link
https://www.raspberrypi.org/documentation/remote-access/ssh/README.md
The local IP address is a dynamic IP, which means that your router can change it at anytime. Try scanning the network again to see if it changed. You can also set up a static IP, which never changes so you can use the same IP every time you log in. This tutorial explains how to set it up: https://circuitbasics.com/Staging/how-to-set-up-a-static-ip-on-the-raspberry-pi/
I tried scanning my network for Pi using the recommended software but can not locate Pi. What am i doing wrong?
Hi
Was able to reach till last step. That is I configured the Pi and clicked “finish” button. After this it came up with option of rebooting which I selected. After rebooting I have logged in back in Pi using Putty. How to proceed further? How can I see the destop of Raspbian OS using Putty?
hi i got error ” software caused connection abort” what should i do now? what is possible error i m making? plz help
Ok found this link in youtube (https://www.youtube.com/watch?v=ZkvHHkWmKSY)
I was able to open the desktop of Raspbian in my laptop running Xming. Wonderful.
Hi manmeet,
Good to hear you have got it running. I just added a post explaining the method I used to setup remote access to the Raspbian desktop. I use the remote desktop connection native to Windows, and/or the Microsoft RD Client App on my iPhone and iPad. It all works wonderfully. Haven’t tried Xming yet, but I’ll give it a shot!
whoah this blog is wonderful i love reading your articles. Keep up the good work! You know, lots of people are looking around for this information, you could help them greatly.
Glad you found it helpful! Thanks!
Hey! Do you use Twitter? I’d like to follow you if that would be ok. I’m definitely enjoying your blog and look forward to new posts.
Great, glad you liked it! I am on twitter: https://www.twitter.com/circuitbasics (@circuitbasics)… I’ll be posting articles regularly so definitely stay tuned!
I followed your instructions and was able to connect my Pi. But when I tried to do the same the next day, I couldn’t connect through PuTTY. The error says connection timed out. Please help.
It’s probably because your local IP has changed. The local IP is a dynamic IP and can be changed anytime by the router. You can either scan the network again to find the new IP, or set up a static IP so the IP doesn’t change. This tutorial will show how to set up a static IP: https://circuitbasics.com/Staging/how-to-set-up-a-static-ip-on-the-raspberry-pi/
The IP address of your RPi can change. Google for how to change from DHCP to static.
Thanks. Great guide. But could I do this in any way without a SD card reader on my computer?
If you have an old MP3 player or other device that uses an sd card and acts as USB storage when connected to a PC, you may try using that as your sd card reader. I used to use an old mobile phone for that, and sometimes used an MP3 player. It may not work because you need block device access to the sd card to write the disk image, which most modern media devices don’t expose to the host pc but some do.
If you need to put an OS on a card you need a card reader. No exceptions.
USB card readers are a few $/£/€.
You might be able to use a digital camera or Android tablet as a USB card reader.
Hi folks, great site, and a lot of useful information.
I was wondering if anybody knows of a good breath sensors for the Raspberry Pi. I came a cross a lot of options on the internet, but not sure which one will suite me better.
What I am trying to do is basically use the breath sensor to breath into via mouth, then take that signal (using Raspberry Pi) and generate MIDI messages to control a sound module.
Like I said, I came a cross multiple sites, just to name a few like:
https://moderndevice.com/product/pressure-sensor-mpxv/#tab-additional_information
and
https://www.cooking-hacks.com/airflow-sensor-breathing-ehealth-medical
But still not sure the accuracy and resolution of the sensor.
Any help is greatly appreciate it. Hope to hear from you folks.
If anyone else was having SSH problems, this guide explains how you can set an IP for your OS. It solved my “Connection refused” errors. http://www.dexterindustries.com/howto/connecting-raspberry-pi-without-monitor-beginners/
The issue you might be having is that this tutorial shows how to SSH with a dynamic IP. This means that your local IP may change from time to time. To get around connection refused errors, you can either set up a static IP, or just run Advanced IP Scanner again to find the new local IP…
Thank you, very usefull!!
Hi,
I like your posts a lot.
I have a question that what to do if you have no Internet router. Just a wifi dongle.
please reply.
I am trying to set up my raspberry pi in headless mode. I got the OS raspbian wheezy on the SD card. Initially when i powered it on with the ethernet cable connected to my laptop and ran the advanced ip scanner, it successfully detected the pi and i was able to access the terminal with putty using pi’s IP. I logged into the device.
When i again tried it later doing everything same as above advanced IP scanner is not able to detect pi. Pi is powered on and connected to the laptop via the ethernet cable. What am i doing wrong ?
Is your Pi connected to your laptop with the ethernet cable, or connected to your router? The Pi needs to be connected to your router with the ethernet cable. If it is connected to your router, powered up, and the IP scanner still doesn’t recognize your Pi, it could be the OS image on the SD card is corrupted. I would try burning a fresh image to the SD
Thank you
is there a good instructions on setting it up from linux platform, rather than from windows?, very clear but no windows PC at home…
is it possible to connect directly whit a ethernet cable from the pc to the Pi ?
do the same, but whit out the router?
Yes you can connect to the pi with an ethernet cable from your laptop. But you’ll need to get access to the command prompt somehow to set it up. See this article to see how to do it: https://circuitbasics.com/Staging/how-to-connect-to-a-raspberry-pi-directly-with-an-ethernet-cable/
Works like a charm! TY
i connect my Rpi ethrrnet cable to my laptop, but when scan for the ip address, it did not detect the RPi ip address….
You should connect your Raspi to your router. Otherwhise you need a running DHCP server on your laptop because your Raspi needs to retrieve an IP address from somewhere.
Great description. I used it to set up my Raspi with Centos 7. It works 1:1. You can download the OS on that page:
http://linux.softpedia.com/dyn-postdownload.php/233a98784de95dcacfc184bfeeb95dbb/56cf5b7c/38a/0/a?tsf=0
Be aware that you have to expand the root partition to full extend after installing the image on the SD card. I used tuxboot/gparted.
And yes, before I forget it. On Raspi Centos 7 the initial user id and password are root / centos :)
I have successfully connected to the Raspberry Pi using SSH, but it does not provide an Internet connection to the Raspberry. I am using now the March 2016 release of Raspbian, in a previous version I was able to connect using SSH and having Internet access simultaneously. Any ideas? Thank you.
SSH isn’t able to share a connection to the internet. To get internet access to your Pi you’ll have to either set up a WiFi dongle: https://circuitbasics.com/Staging/raspberry-pi-wifi-installing-wifi-dongle/
Or set up a shared network connection between your Pi and a PC via an ethernet cable: https://circuitbasics.com/Staging/how-to-connect-to-a-raspberry-pi-directly-with-an-ethernet-cable/
hi , i cannot find the ip address ! actually there is no raspbian device on the router page , even we i did the Ethernet connection between router and raspberry. what about the computer connection ? should it connected by cable to router? .. i do not know where is the problem ! any one help me please ..
The PC doesn’t need to be physically connected to the router. It just needs to be connected to the network via WiFi or any other way. It sounds like your SD image may be corrupted. Have you tried re writing the image to the SD card?
@Amani Just hook up an USB keyboard and a monitor(for testing purposes and troubleshooting it is very usefull to have) and run ifconfig (like ipconfig for windows). if it comes up with nothing your software configuration or hardware is broken.
This was one really good article on running the raspberry pi running headless. infact this is the only one that helped me out all the way through to get my rasp up and running. Thanks lot.
Once again I really appreciate the effort you have take in explaining the steps clear and precise .
Regards
Arun
hi evry one
my problem is a i install ububntu mate in my sd card for raspberry pi 3 but i dont have monitor and linux os in my laptop i can conact to raspbian with my laptop to monitor os but i can not conact to ubuntu mate with my ethernet cable but ssh in ububntu mate not runing someone help me to solve my problem i have tablet but i dont any hdmi or hdmi to vga cable evry thin i have laptop with windows 10 (dont have linux os) and ethernet cable and tablet..please help
I get the IP with Wireshark, connecting and seeing what ARP protocol messages were interchange, in one of these messages is the Raspberry PI IP
Brilliant explanation, thank you, works first time
I get the IP with Wireshark, connecting and seeing what ARP protocol messages were interchange, in one of the messages is the Raspberry PI IP
i have the problem that after i enter my pi”s ip in putty and click open putty opens but nothing comes on it. what am i doing wrong? Pls help me solve it
Did it work before?
Nice, worked a treat. Many thanks :-)
Ip scanner ain’t showing raspberryPi what possibly could have gone wrong
If your Pi is connected to your router with an ethernet cable and powered on, and Advanced IP Scanner still doesn’t recognize the Pi, it could be something is corrupted on your SD card. Try re writing the image to the SD card, that will probably fix it.
This guide is really helpful! Thank you!
Hi,
I have followed all steps mentioned above to boot my RPi for the first time, I am able to ping my RPi also, but issue is I am not able to do ssh to it, tried all possible options,
please let me know what could be the solution.
thanks
As of the November 2016 release, Raspbian has the SSH server disabled by default. You will have to enable it manually. This is done using raspi-config
https://www.raspberrypi.org/documentation/remote-access/ssh/
I’ve just updated the post to include these changes to Raspbian.
The instructions have a small typo. The ssh file needs to go in the “boot” partition, but the instructions say “root” partition.
thank you for writing this!!
Thank you, MC. This needs to be updated at the top!
Alternatively:
“For headless setup, SSH can be enabled by placing a file named ‘ssh’, without any extension, onto the boot partition of the SD card.”
Worked right away after this additional step.
OK I tried this part on a macbook pro, and it doesn’t seem to be working. Still says “connection refused” when I try to connect via ssh. Am I putting the SSH file in the wrong place on the SD card? And how do I put it where it needs to be?
Thanks for this info on the ssh file to trigger ssh — I was stuck without it.
Thank you for your detail tutorial
ive followed all the steps..and now can ping the ip,
however when i tried ssh through putty, it came up with “Network error: connection refuse”
i am losing hope and gonna find a keyboard and monitor ..
SSH is disabled by default in Raspbian versions released after Nov. 2016. To enable SSH without accessing the command prompt, add an empty file named “SSH” (without extensions) to the root partition of the SD. I’ve updated the post, check it out for more details…
All you need to do is create an empty file called “SSH” and place it in the root partition of the SD card. The file should have no extensions like “.txt” or “.doc”. The easiest way to do this is to open up a text editor like Notepad and save the blank page as “SSH.txt”. Close the text editor, then rename the file to delete the “.txt” extension. After that, move the file to the top level folder of the SD card (the root partition).
Currently using Win 7 on desktop and Win 10 on HP Pavilion and removing the file extension “.txt” has me at a standstill.
After you save the empty .txt file and go to rename it, are you able to see the “.txt” extension in the file name? If so, you can just delete that part. If you can’t see the file extension when you rename it, you probably just need to enable viewing file extensions in your windows browser. To do that, click on “View”, then select the check box for “file name extensions”. That should fix it. Here’s an article that explains it: http://kb.winzip.com/kb/entry/26/
TY, since advancing from XP to 7 and 10 the learning ladder has gotten taller….
I battled the “Connect to PC” for days, tried the SSH file in the root with no luck so I connected to Vizio with just a mouse and HDMI, enabled SSH and now my connections are solid. Have noticed the IP found has not changed after multiple connections so I will assume mine is static!
I am not able to connect with laptop. IP config error. Please help me.I am using puTTy & SSH. All done just network connection error.
Whatever I do, I am able to access my Raspberry Pi 3 after connecting to my TV only through HDMI. However I can’t connect through the ethernet. it never detects raspberry in my advanced IP scanner and can’t connect through putty.
Santosh
You can pause the scene in any video and ask students to circle the names of the
colors they see on a printed list you deliver.
the file ‘ssh’ needs to be created in /boot/ directory and not in the root directory.
yes I agree with you !! According to https://raspberrypi.stackexchange.com/questions/59763/ssh-server-not-started-on-boot-boot-ssh-present , you need to put the “ssh” file in the boot partition. Be careful to not make confusion with the /boot/ folder of the second partition !!
Property for Fisher-Cost Toys & Additional Use of this web site signifies your acceptance of the terms and conditions of use.
Fort Lewis College
I’m not able to find RaspberryPi’s IP adress
But why ?
Thank you for your great information tutorial.
I downloaded ” 2017-09-07-raspbian-stretch-lite”
I created a new file SHH and copied the empty file to SD card root
I connected straight network cable between my laptop and the Pi
I powered up the pi
I cannot find the IP address of the pi
I set my (win 8.1) laptop Ethernet adapter to static IP 192.168.137.1 , Allowed sharing – still I cannot see the pi IP
I also tried to set the Ethernet adapter to DHCP – using ipconfig /all , I can see the assigned IP address of my laptop adapter
But I cannot see the Raspberry pi IP
I disabled Windows firewall
Can you please try to assist me to find out the PIs IP so I can use Putty SSH to establish a connection to my PI?
Many thanks
Please try to advise me what I do wrong .
Hello,
I have connected my rpi and my computer to my router. When I put the rpi’s IP address on putty it says Network error: Connection timed out. But then I disconnected my rpi from the router and used IP scanner again and it still find the rpi’s IP address even though it is disconnected. I also used ping raspberrypi on command prompt and it says: ping request cannot find host raspberrypi.Could you please help me? I have been trying for days and can’t seem to find the problem.
Millions of men and women around the world are hooked onto game
titles these days. Once you might be knowledgeable about the terms
in the game, you’re set to experience the overall game towards the fullest.
Even though Xbox systems and Wii games took plenty share from the gaming market, Play – Station games are nevertheless some of the best games available.
You still need a keyboard and a monitor, no?
“After that, move the file to the top level folder of the SD card (the root partition).” Can you show me what folder? cuz i tried every folder in the SD card but i still couldn’t get the IP of the Pi
Thank you very much.. but I still do not understand it very well. I am doing a project to detect motion an object around an area using machine learning algorithms ( specifically YOLO detector).. My question is I write the python script on my computer then setup the raspberry pi ( I install opencv , python on the raspberry pi).
1. to use the raspberry pi where should I store the codeon the raspberry pi? I am not supposed to take the computer to the area where I detect motion..
2. How the code run automatically? if it is on my computer I have to click the run button to run a code.
Item was DOA. Returned and purchased a different brand. Tried from multiple displayports to multiple monitors. Even tried on different workstations as well as multiple video cards. Nothing worked.
Regards
Damremo
After numerous attempts to boot the Rasp 3 B+ with both a 32 Gb and a 16 Gb micro-SD card I still have a dead board!!
I have downloaded the latest update of Raspian stretch, un zipped it and copied a SSH file with no .txt suffix.
All were image copied to each card and inserted in turn, both were new cards.
powered up and red led on green led flashed twice then off.
PCB`s setup with an Ethernet cable to my modem / router with the desktop pc running in Wi-Fi mode to reach the Raspian in an headless setup.
Tested the cable in PC works fine.
I used the PUTTY app the read network IP`s got one for Rasp 192.168.0.8 plus the manufactures name so I believe the router works fine.
Frankly I`m baffled is the Rasp dead or have I forgotten something?
Any suggestions much appreciated.
David Marsh.
I have tried many instructions to connect my Raspberry Pi 3 to my PC and yours is definitely the best until I get to the part ” insert the ssh file into the boot or top, section of the software. I have downloaded the Raspian Stretch Lite version. I have zipped the software into the micro SD card and it appears as SD Boot G: I have no idea where the top level of the boot file is., so I opened the SD card and pasted the ssh file into the card. After entering the IP address into Putty the Putty command appears but it is blank and soon times out. This is obviously an ssh issue but where do I go from here?
Reference my last post. Happy days I have at last connected with my Raspberry Pi on my computer. But this happiness did not last. When I tried to login a second time the keyboard goes dead after I enter the Pi and go to the password . It asks for the password but the keyboard will no make any entries just nothing. I have tried the Raspberry Pi connected by HDMI to my YV but the same thing happens.
Thank you so much…. It’s working after several attempts.
Hi, could someone update this article?
Specifically, in the headless setup section, the filename should be ‘ssh’ lowercase, and on the boot partition – not the root partition.
Source: https://www.raspberrypi.org/documentation/remote-access/ssh/
Otherwise, great tutorial – thanks!
Sir,
i am newbie, I am using Raspberry pi 2 Model B, i have loaded image Raspbian Jessy Image.
i followed steps before “ESTABLISH AN SSH CONNECTION TO YOUR RASPBERRY PI” , I am getting Error ” Network Error : Connection Refused”,
and i couldnot find my raspbian ip in “Advance Ip Scanner ” Also.
Can you help me to Resolve this issue
Very good article. I absolutely appreciate this site.
Thanks!
Funny I found your tutorial before the official documentation via duckduckgo. Thanks for your work.
Little Error:
>All you need to do is create an empty file called “SSH” and place it in the root partition of the SD card. The file should have no extensions like “.txt” or “.doc”.
It’s the **boot** partition, not **root** and the documentation wants the file to be lowercase. Chapter 3 in https://www.raspberrypi.org/documentation/remote-access/ssh/
Thanks for this… a great help.
For Linux people wanting to set up a headless RPi, the SSH file goes into the boot partition, not the rootfs partition.
Hi,
I do not have a router at home. How could I proceed.
Many thanks.
Yes, you are right, thanks for bringing that to my attention. I’ve updated the post to skip this step…
Yes, you are right. There is no reason for the second formatting as the disk is re-partitioned after the image is written to it.