
In the previous article, I described the steps needed to install an LCD touchscreen on the Raspberry Pi. In this article, I will show you how to adjust the screen rotation of the LCD to landscape mode, and will show you how to calibrate the touchscreen pointer for optimal accuracy. Just follow the steps below to compete the process of setting up your Raspberry Pi LCD touchscreen:
1. First we need to change the setting for screen rotation in the /boot/cmdline.txt file. This setting is called fbtft_device.rotate=X. By default, this is set to X=0, which results in a portrait mode screen orientation. In order to switch the orientation to landscape mode, change fbtft_device.rotate=0 to fbtft_device.rotate=90. Enter sudo nano /boot/cmdline.txt at the command prompt. There should only be one line in this file. Go to the end of it and you will find the fbtft_device.rotate=X setting. Change the value from 0 to 90:
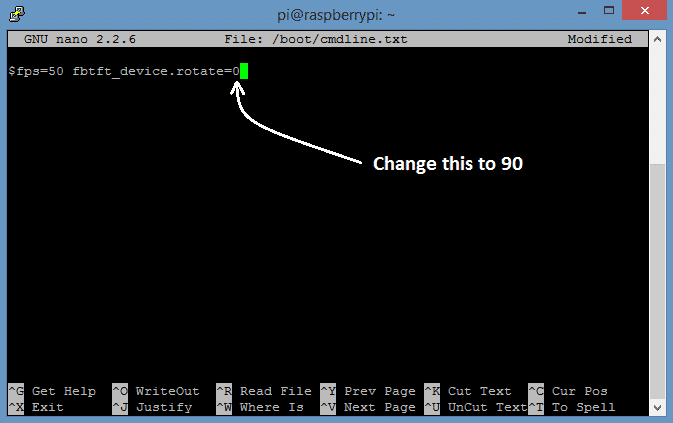
Press Ctrl-X then Y to exit nano and save the changes, then enter sudo reboot or sudo poweroff to reboot the Pi.
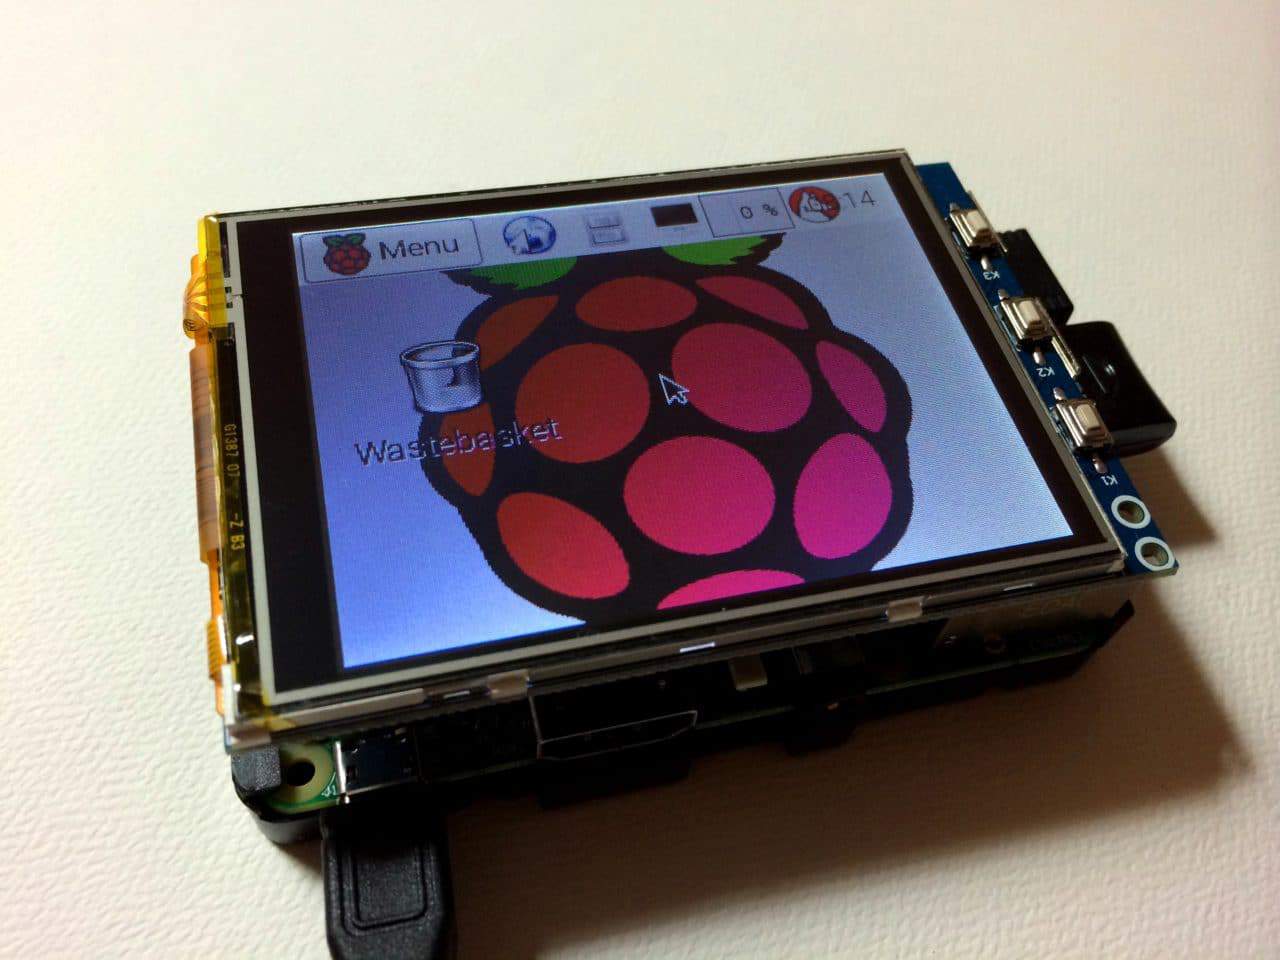
You should now see that the screen rotation has changed to landscape mode:
However, if you try to touch the screen now, you will find that the pointer movement does not correspond to your finger movement. This is because the LCD screen driver and the touchscreen controller driver have separate settings for screen rotation. We need to change the rotation of the touchscreen controller driver to match the rotation of the LCD screen driver.
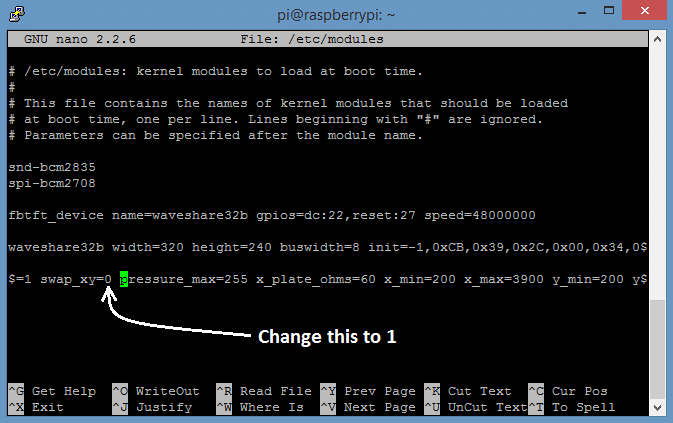
2. You probably noticed that dragging your finger to the right moves the pointer up, not to the right. This indicates that the x and y axes of the touchscreen are swapped. To correct this, we need to swap the x axis for the y axis. This can be done by changing the swap_xy=X parameter in /etc/modules.
Enter sudo nano /etc/modules at the command prompt to edit the file. Go to the line for the ads7846_device parameters and move the cursor to the right to find it:
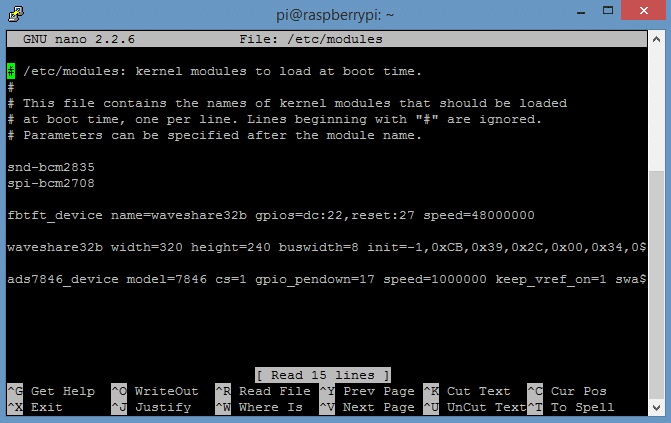
Change swap_xy=0 to swap_xy=1:
Press Ctrl-X then Y to exit nano and save the changes, then enter sudo reboot to reboot the Pi.
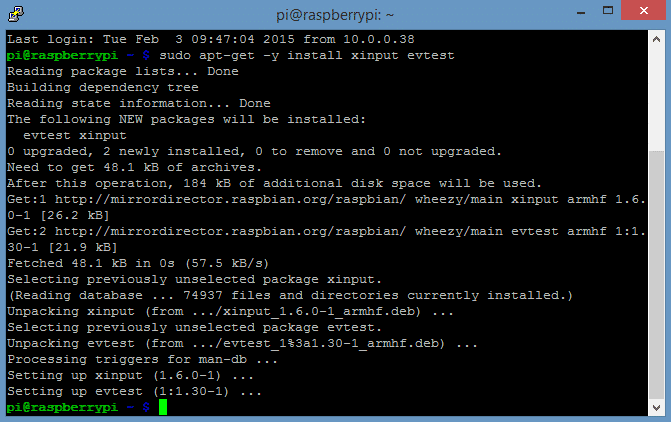
Now if you drag your finger around the screen, you will notice that the y axis (up and down) is correctly aligned with the motion of your finger. However, the x axis (left and right) is still inverted. To fix this, we need to install two more kernel modules, xinput and evtest. xinput is a Linux utility that will allow us to configure input device settings for the touchscreen controller, and evtest is an input device event monitor and query tool.
3. Install the utilities by entering sudo apt-get -y install xinput evtest at the command prompt:
Press Ctrl-X then Y to exit nano and save the changes, then enter sudo reboot to reboot the Pi.
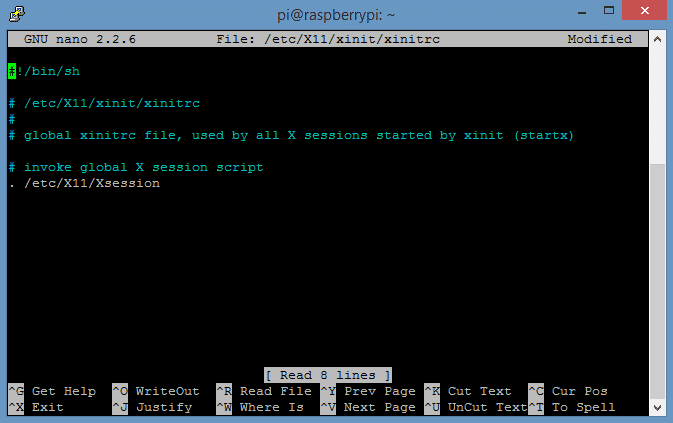
Now, we need to edit the /etc/X11/xinit/xinitrc file. Enter sudo nano /etc/X11/xinit/xinitrc at the command prompt to edit it:
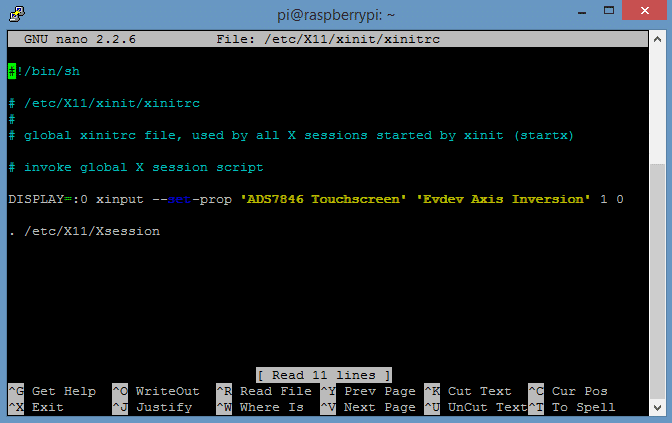
Now add this code above the./etc/X11/Xsession line:
DISPLAY=:0 xinput --set-prop 'ADS7846 Touchscreen' 'Evdev Axis Inversion' 1 0The file should now look like this:
Press Ctrl-X then Y to exit nano and save the changes, then enter sudo reboot to reboot the Pi.
After the Pi finishes rebooting, you should notice that when you move your finger across the touch screen, the pointer should follow correctly in both axes. If you are using the Raspberry Pi 2 Model B, you will need to complete the calibration steps below before the pointer follows your finger correctly (and make sure that you have enabled startx to load automatically – see step 6 in this article).
Change Screen Rotation to Any Orientation
You can rotate the screen 90 degrees (as we did in this tutorial) and the power connector will be at the bottom of the screen, but you can also rotate it 270 degrees so that the power connector is at the top of the screen. To do this, simply enter fbtft_device.rotate=270 in the /boot/cmdline.txt file. Then change the DISPLAY=:0 xinput --set-prop 'ADS7846 Touchscreen' 'Evdev Axis Inversion' 0 1 line in the /etc/X11/xinit/xinitrc file to DISPLAY=:0 xinput --set-prop 'ADS7846 Touchscreen' 'Evdev Axis Inversion' 1 0. All you need to do is switch the values of the 0 and 1 at the end of this line.
Here is a short video tutorial showing the steps above:
Touchscreen Calibration
Now that we have our LCD touchscreen up and running, the final step in the installation is the calibration of touch control. This will make the pointer much more accurate and easier to use.
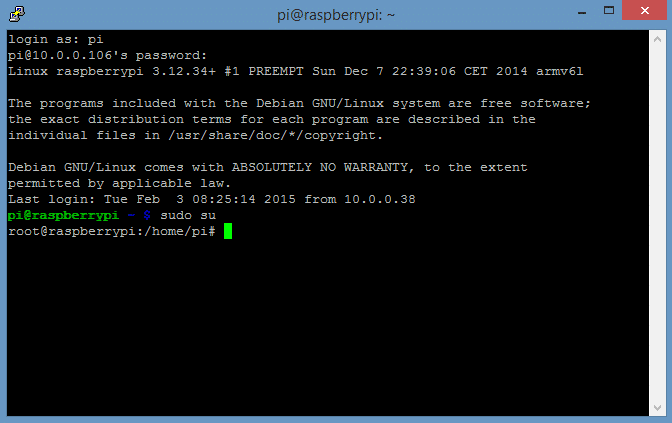
1. This process needs to be done using super user (root) privileges. Enter sudo su at the command prompt to enter root mode:
2. Now we need to install the calibration tool we will be using, xinput_calibrator; and other filters for controlling the touchscreen response. Install the tslib library by entering aptitude install libts-bin:
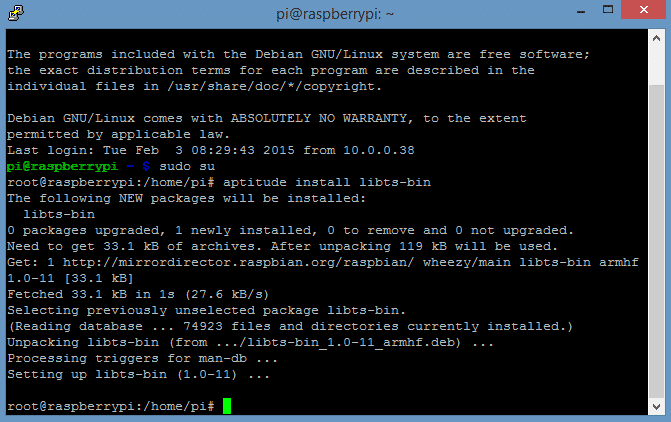
This will create a configuration file called /etc/ts.conf, which contains settings for variance and jitter that can be changed to optimize pointer response. See here for information about configuring ts.conf.
3. The calibration tool we will use is called ts_calibrate. We will also be using a program to check the results of the calibration called ts_test. In order to use ts_calibrate and ts_test, we must first set proper environmental variables. Enter export TSLIB_TSDEVICE=/dev/input/event0 into the command prompt, then enter export TSLIB_FBDEVICE=/dev/fb1:
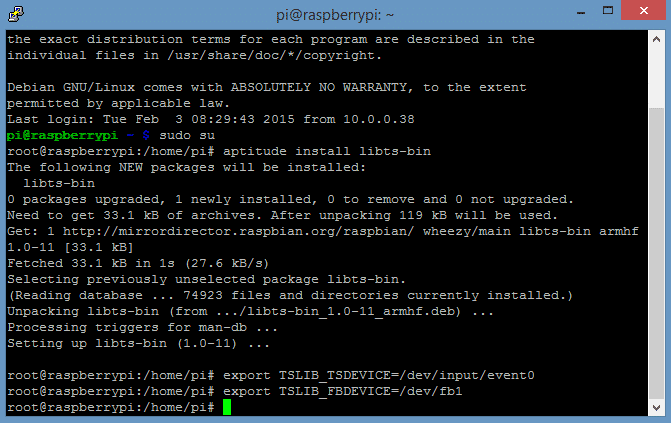
You will need to re-enter these two lines each time you want to use ts_calibrate or ts_test if you log out of PuTTY or reboot your Raspberry Pi.
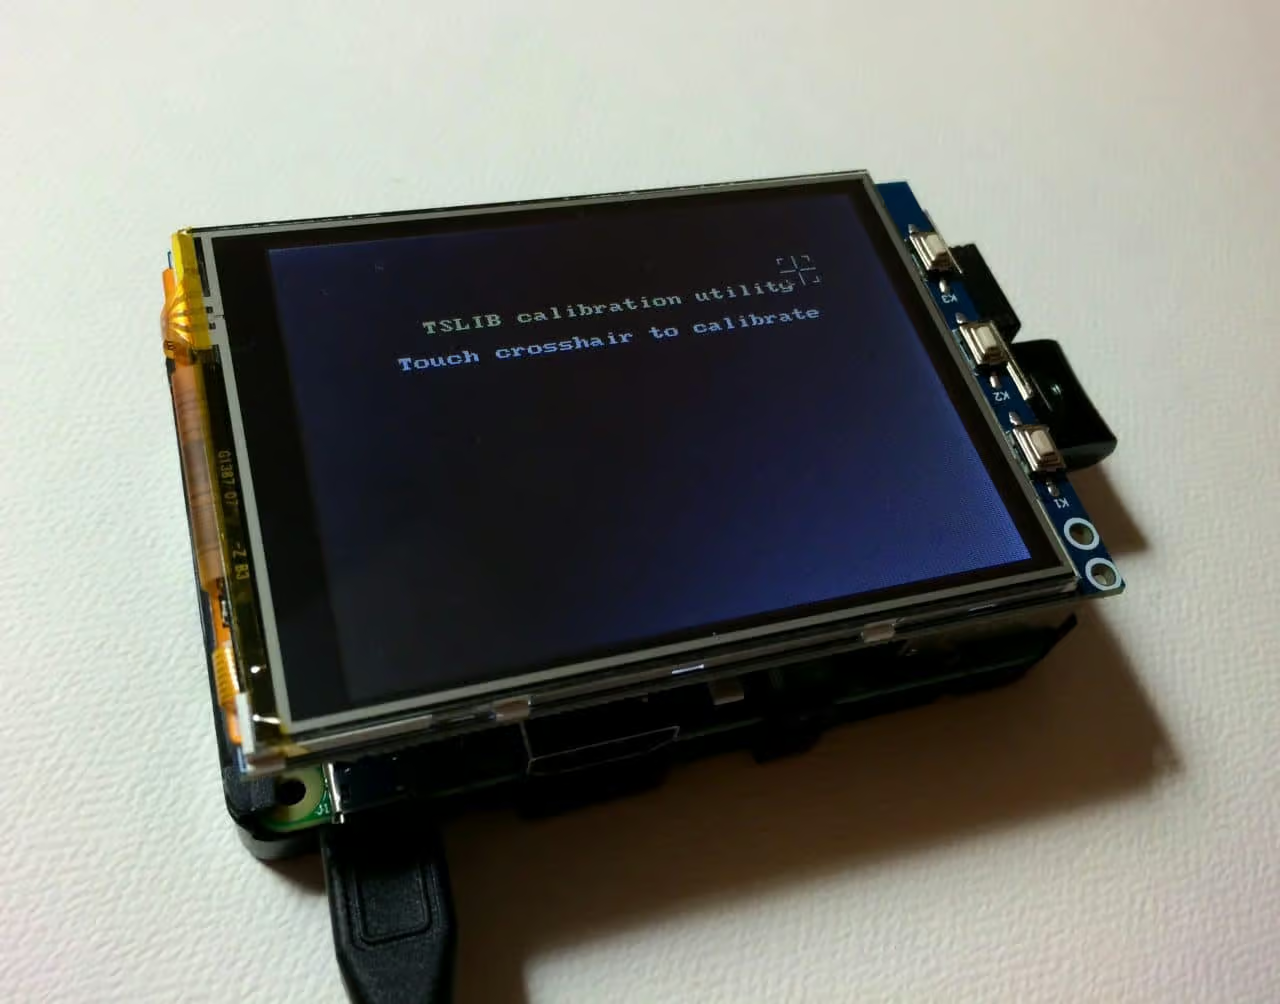
4. Now we can use ts_calibrate. Enter ts_calibrate at the command prompt (make sure you are still in root mode) to run the ts_calibrate program. The program will consecutively display five crosses on different parts of the screen, which you need to touch with as much precision as possible:
PuTTY will output the calibration data after the calibration is complete:
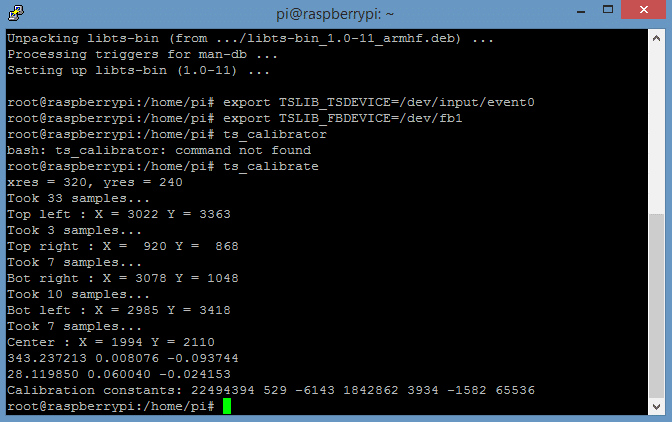
This calibration data will be written to a calibration file called /etc/pointercal. To view the contents of this file, enter cat /etc/pointercal at the root command prompt.
5. We should now test the calibration by using the ts_test program. Enter ts_test at the root command prompt to start the program:
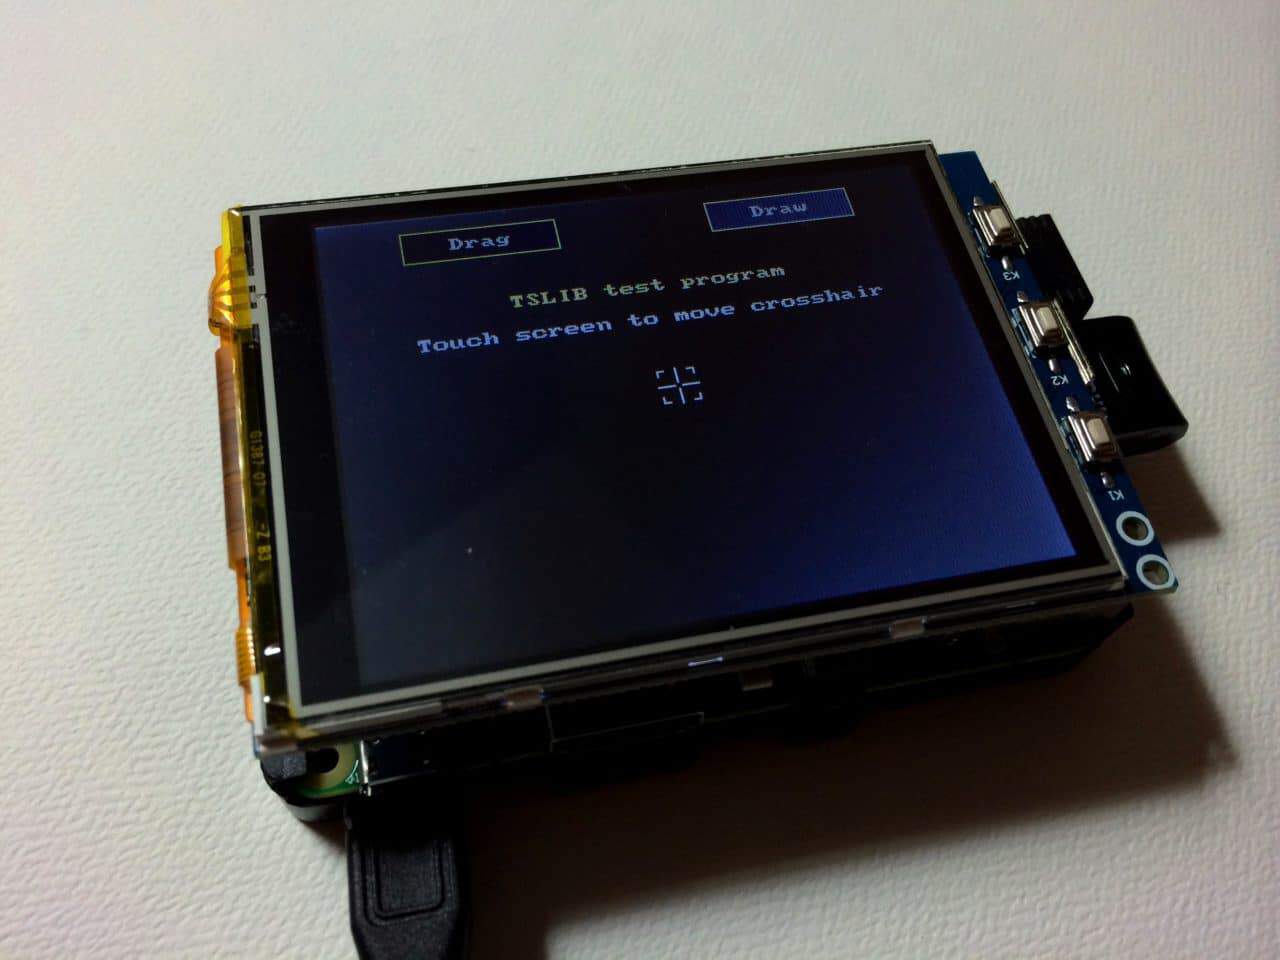
Drag the cross around the screen and observe how closely it follows your finger or stylus to test the accuracy of the calibration. Now press the “Draw” button to enter the drawing mode:
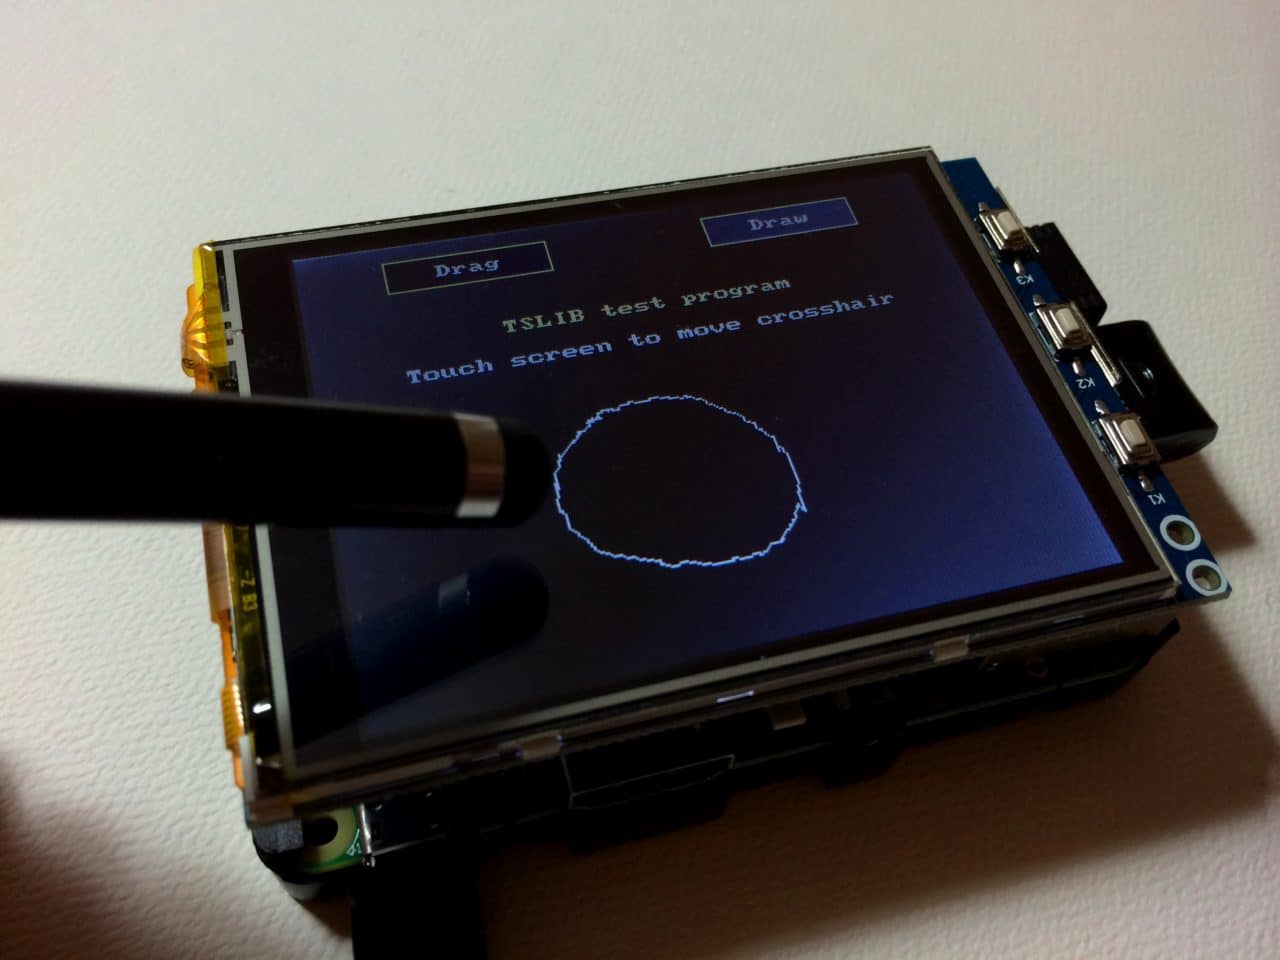
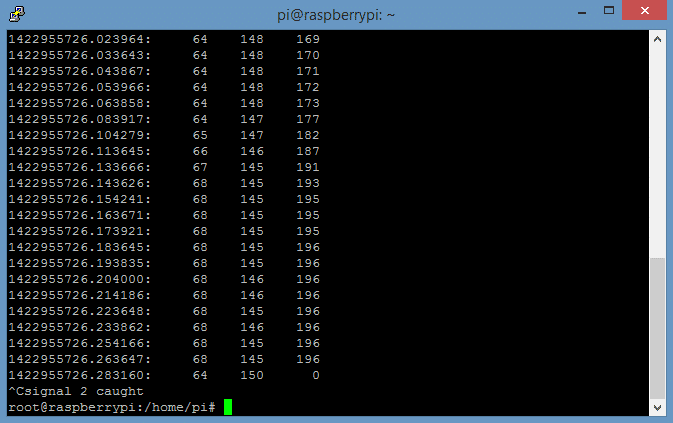
Drag your finger or stylus around the screen to test the accuracy of the calibration.
Press Ctrl-C to stop the test.
If necessary, run ts_calibrate again to improve the calibration.
Now enter sudo reboot at the command prompt to reboot, and you should be all set to explore the Raspbian desktop on your LCD touch screen!
Watch the video for the calibration tutorial here:
This is kind of a long process, but it is well worth it if you want to get the LCD touchscreen set up properly. So if you have any trouble setting this up or have anything to say, please leave a comment below. Also, if you found this article useful, please share it with your friends!


Hi great guide which has worked perfectly so far but getting
selected device is not a touchscreen I understand
when I enter ts_calibrate any ideas
try using another entry. see the other entries in folder dev/input/. I needed to use “event2” instead of “event0” as written here. just try…
So you are getting an error that says “selected device is not a touchscreen? What screen are you using?
Thanks for these great step for step instructions. I followed completely. But I can´t change the Rotation of my Desktop. That´s not so hard as it´s already widescreen. What´s really bad is, I can´t change the Touch axis. I tried several Times, but it stays contrary. When calibrating, everything is fine and looks good, but not after reboot. I have this Display http://www.ebay.de/itm/3-2-TFT-LCD-Module-RGB-Touch-Screen-Display-Monitor-For-Raspberry-Pi-Board-/251686519220?pt=LH_DefaultDomain_77&hash=item3a99af81b4 (but without these 2 LEDs down at the switches). The provided Image uses Settings for “flexfb” and so I tried these. There´s written tontec on the Displays Backside, but it didn´t work with tontec settings. Would be great if you could help me to bring it to work.
Thanks for a great how-to, the image I got with my screen has never even booted successfully but your guides have got me up and running with my Waveshare 3.2 v4 on my RPi2. :-)
I’ve been thinking about my next steps with this screen and I’m interested to know how far you’ve got / what you’ve done with yours:
– the buttons on the side of the screen, do you have yours working?
– have you managed to get the screen to wake up when touching the screen or one of the buttons?
– when the screen goes to sleep have you figured out a way to get the backlight to switch off?
Thanks,
Nick
Buttons can be accessed directly via GPIO. On my WaveShare SpotPear v4 these are pins 12,16 and 18.
import RPi.GPIO as GPIO
GPIO.setmode(GPIO.BOARD)
GPIO.setup(12, GPIO.IN, pull_up_down = GPIO.PUD_UP)
GPIO.setup(16, GPIO.IN, pull_up_down = GPIO.PUD_UP)
GPIO.setup(18, GPIO.IN, pull_up_down = GPIO.PUD_UP)
while True:
if(GPIO.input(12) == 0):
print(“Button 1 pressed”)
if(GPIO.input(16) == 0):
print(“Button 2 pressed”)
if(GPIO.input(18) == 0):
print(“Button 3 pressed”)
GPIO.cleanup()
Hello i have a waveshare 32b v4 and the touchscreen doesn’t work at all. ts_calibrate can’t open file ts_open and i have no touchscreen file in /dev
I haven’t got this to work yet, but honestly haven’t looked into it very much. It would be great to get the buttons working and the backlight turning on and off with the shutdown command. Please let us know if you find out how!
Hi
I use the Waveshare 3.2 v4 on my RPi2 display and by the calibration with putty i have the same problem no touchscreen monitor i understand. I am an absolutly noob i have no idea whats happen.
root@raspberrypi:/home/pi# export TSLIB_TSDEVICE=/dev/input/event0
root@raspberrypi:/home/pi# export TSLIB_FBDEVICE=/dev/fb1
root@raspberrypi:/home/pi# ts_calibrate
xres = 320, yres = 240
selected device is not a touchscreen I understand
Took 1 samples…
Top left : X = -1225542628 Y = -1092915956
Took 1 samples…
Top right : X = -1225542628 Y = -1092915956
Took 1 samples…
Bot right : X = -1225542628 Y = -1092915956
Took 1 samples…
Bot left : X = -1225542628 Y = -1092915956
Took 1 samples…
Center : X = -1225542628 Y = -1092915956
0.210513 0.494744 -0.554781
0.860292 0.412964 -0.463078
Calibration constants: 13796 32423 -36358 56380 27063 -30348 65536
root@raspberrypi:/home/pi# ts_test
selected device is not a touchscreen I understand
The touchscreen is working good thats not the problem. Your manual its very great. Thank you
Try changing the export to TSLIB_TSDEVICE=/dev/input/event2
I get the cal screen to stay up but it won’t detect me tapping the crosshair
A quick update – if you have keyboard / mice / other input devices then the event device number changes. To protect against this, use this export :
export TSLIB_TSDEVICE=/dev/input/by-path/platform-bcm2708_spi.0-event
Saying that , I still can’t progress through the calibration as it wont seem to respond to taps.Perhaps my display is faulty.
Even better do it by-id which gives even clearer names. In my case:
sudo TSLIB_TSDEVICE=/dev/input/by-id/usb-eGalax_Inc._USB_TouchController-event-if00 TSLIB_FBDEVICE=/dev/fb0 ts_calibrate
As I understand you need to run test directly on the rasbpi, typing that command through attached Keyboard. As when you run test from putty it will do scan for your computer monitor. Correct me if I’m wrong.
In my case when I ran calibration from rasbpi directly, it show screen for few second with cross moving around and finish. and with test, it show cross on middle of the screen but no respond to test. Though when I run startx, it respond to touch correctly.
I able to make if work on raspi2.
When I start simple python program (that create window with buttons) from command prompt, I get error
_tkinter.TclError: no display name and no $DISPLAY environment variable
Any Help, what I’m missing? how I can start program pointing to display it on touch screen?
Is there a way to switch back to HDMI without undoing all the changes? I have gotten my Pi2 working with the waveshare via this and the other tutorial. I would like to setup some things with a full display and then use the TFT screen for more mobile things.
i tried the first command… the file doesnt have the same stuff on the pi2 so there isnt even a place to change the zero and ninety…
did you copy the whole line. I make the same mistake at first and then copy the line by selecting all.
Hi,
I’m using the waveshare 3.2 V3 on a Raspberry 2 b. The first part of the installation works fine. And I can also change the mouse movement when I follow these instructions. But the screen rotation doesn’t work. I’ve no idea how to fix that. Any ideas?
Hi,
I’m using the waveshare 3.2 V3 on a Raspberry 2 b. The first part of the installation works fine. Screen rotation doesn’t work but the mouse movement when is not working ?
Great Tutorial!!
Very clear and straightforward tutorial – many thanks.
But – there’s always a ‘but’ – I’m getting the same problem as a couple of other folks, where I am not able to change the screen orientation. I have changed the value of fbtft_device.rotate to 90 and restarted, but the orientation doesn’t change. I wonder whether there has been a change in a recent OS update?
Hi Jimc,
I just went through the installation on a Raspberry Pi 2 Model B, using the Waveshare 3.2″ LCD touchscreen and the 2-16-15 release of Raspbian. Everything worked ok, however I noticed that sometimes I would need to poweroff and unplug instead of just reboot for the setting changes to take effect. I’m wondering, what screen are you using, and what version of Raspbian?
Hi,
Well, the good news is that everything is now working very nicely. The bad news is that I can’t account for it. It may well have been down to a complete unplug and replug, although I originally thought that it may have been associated with having a blank line at the end of my /boot/cmdline.txt file. But I cannot reproduce the problem at all now, so I can’t be more help, I’m afraid.
Apart from that little wobble, I’ve found this to be an excellent article, and very clear and straightforward to follow. All I need to do now is to finish implementing my menu system using Pi4J to handle the buttons.
Many thanks!
I installed on my TFTLCD32 (V4.1) got from BangGood and work perfectly. I set the rotation to 270 (Power connector UP) but I have ever the touch screen Y axes inverted. I tried all combination explained. (DISPLAY=:0 xinput –set-prop ‘ADS7846 Touchscreen’ ‘Evdev Axis Inversion’ 1 0) or 0 1 this in particular seems have not any effects. Someone can help ?
Also is possible to reduce the icon size on raspbian ?
Thanks in advance
I fixed the inverted Y axes on touch screen.
downloaded the needed module with these commands:
sudo pip install evdev
sudo pip install xinput
I added this code on the /usr/share/X11/xorg.conf.d/99-fbturbo.conf
Section “InputClass”
Identifier “evdev touchscreen catchall”
MatchIsTouchscreen “on”
MatchDevicePath “/dev/input/event*”
Driver “evdev”
Option “InvertY” “true”
Option “GrabDevice” “True”
EndSection
Also in the section you can add these lines in case you need:
Option “SwapAxes” “True”
Option “InvertX” “true”
Thanks
Bye
You have my deepest gratitude! I spent whole day trying to adjust the cursor movements for 270 degrees screen rotation. Finally I found your post and it made my day. (I am using latest Pi OS as of March 2016 with the proper 7″ screen).
oh, my god
I was looking for a solution
Your reply is correct
thank you..!!!!!!!!!!!!!!!!!!!!!!!!!!!!!!!!
Thanks Thor, your instructions adding code on the /usr/share/X11/xorg.conf.d/99-fbturbo.conf fixed problem I had with inverted x-axis on my RPi model B + WaveShare SpotPear 3.2 inch LCD (V3).
As an example this should get the 3 buttons working for anyone who needed them. Create a file by typing sudo nano /home/pi/switch.py enter the below text, save and exit, then enter sudo python switch.py to test. If working then add “python /home/pi/switch.py” without quotes to bottom of file before exit 0 to have it at startup….This is working on my Pi2 with 2015-02-16-raspbian-wheezy image.
import RPi.GPIO as GPIO
import time
import os
GPIO.setmode(GPIO.BOARD)
GPIO.setup(12, GPIO.IN, pull_up_down=GPIO.PUD_UP)
GPIO.setup(16, GPIO.IN, pull_up_down=GPIO.PUD_UP)
GPIO.setup(18, GPIO.IN, pull_up_down=GPIO.PUD_UP)
while True:
if GPIO.input(12) == False:
print(‘Button 1’)
os.system(“sudo shutdown -h now”)
time.sleep(0.2)
if GPIO.input(16) == False:
print(‘Button 2’)
time.sleep(0.2)
if GPIO.input(18) == False:
print(‘Button 3’)
time.sleep(0.2)
GPIO.cleanup()
Thanks, I can see the output of buttons now. Now it would be easy to develop some applications.
Hi
I am also using the same waveshare 3.2″ touchscreen as you are and I followed all the instructions clearly.
I’ve successfully enabled the SPI display output and rotated the screen to my liking, thanks to your instructions and kudos for the same.
But, i’m facing two issues:
First, my touchscreen wont recognise touch. When I run ts_calibrate the display flashes with the crosshair screen for a very very brief time and on the terminal it reads:
root@raspberrypi:/home/pi# export TSLIB_TSDEVICE=/dev/input/event0
root@raspberrypi:/home/pi# export TSLIB_FBDEVICE=/dev/fb1
root@raspberrypi:/home/pi# ts_calibrate
xres = 320, yres = 240
selected device is not a touchscreen I understand
Took 1 samples…
Top left : X = -1225595876 Y = -1093006084
Took 1 samples…
Top right : X = -1225595876 Y = -1093006084
Took 1 samples…
Bot right : X = -1225595876 Y = -1093006084
Took 1 samples…
Bot left : X = -1225595876 Y = -1093006084
Took 1 samples…
Center : X = -1225595876 Y = -1093006084
-0.265507 -0.309292 0.346811
0.462141 -0.258298 0.289631
Calibration constants: -17400 -20269 22728 30286 -16927 18981 65536
root@raspberrypi:/home/pi#
Second, and the reason why I went to all the trouble, is the omxplayer wont play videos. I can only get the audio via the jack.
Can you please help me out here?
Thanks!
NEWS !!!
on the 2015-03-27 the notro firmware was changed
Changelog
FBTFT support is now in raspberrypi/linux. This release only adds SPI DMA support on top of that.
pitft overlay changed name to pitft28-resistive
These modules are no longer present:
gpio_keys_device – DT overlay example
ads7846_device – Use ads7846 DT overlay instead. See /boot/overlays/README
gpio_mouse_device
stmpe_device
gpio_backlight_device
rpi_power_switch
spi-config
In particular you can see this line:
ads7846_device – Use ads7846 DT overlay instead
That means that the touchscreen no longer works with the current exposed procedure.
According to what noticed, dtoverlay was needed.
So i tried to make this change, editing the etc/modules file and replaced the line
ads7846_device model=7846 cs=1 gpio_pendown=17 speed=1000000 keep_vref_on=1 swap_xy=0 pressure_max=255 x_plate_ohms=60 x_min=200 x_max=3900 y_min=200 y_max=3900
with
dtoverlay=ads7846,cs=1, penirq=17, speed=1000000, swapxy=0, pmax=255, xohms=60, xmin=200, xmax=3900, ymin=200, ymax=3900
But seems there are not life signal of the touchscreen. As I can see typing ls /dev/input where I can’t see the evdevx device.
I’m not enough smart to find a clue, there are someone can help ?
Thanks
I also added these lines in /boot/config.txt
device_tree=ads7846-overlay.dtb
dtoverlay=ads7846,cs=1, penirq=17, speed=1000000, swapxy=0, pmax=255, xohms=60, xmin=200, xmax=3900, ymin=200, ymax=3900
but the touchscreen doesn’t work anymore.
OK I got it working again:
1) sudo cp /boot/overlays/ads7846-overlay.dtb /boot/
2) remove from etc/modules the line ads7846_device model=7846 cs=1 gpio_pendown=17 speed=1000000 keep_vref_on=1 swap_xy=0 pressure_max=255 x_plate_ohms=60 x_min=200 x_max=3900 y_min=200 y_max=3900
and replace with only ads7846
3) sudo nano /boot/config.txt
add
device_tree=bcm2709-rpi-2-b.dtb # for RSPI 2 Ver.b (use proper vcmxxx according with your version of rpi check in boot folder to see the dub available)
dtparam=spi=on
dtparam=i2c=on
dtparam=i2c1=on
dtparam=i2c_arm=on
device_tree=ads7846-overlay.dtb
dtoverlay=ads7846,cs=1, penirq=17, speed=1000000, swapxy=0, pmax=255, xohms=60, xmin=200, xmax=3900, ymin=200, ymax=3900
After this touch screen return working again with new kernel
I have a new problem..
Touchscreen now is working, and if I use in GUI X environment it track correctly. So if I start in console mode, and run a python pygame script that use touchscreen, it result totally uncalibrated and with Y axes inverted.
I tried every procedure for calibrate the touch, but all seems related to X environment, but the python pygame script do not use X environment. So Where are the calibration info for non X env ?
off course I added these lines on my python pygame scripts in order to make touchscreen working
os.environ[“SDL_FBDEV”] = “/dev/fb1”
os.environ[“SDL_MOUSEDEV”] = “/dev/input/touchscreen”
os.environ[“SDL_MOUSEDRV”] = “TSLIB”
Also I’m unable to override calibration info that I don’t know where are.
editing these files have not any effect, due X do not star at all.
/usr/share/X11/xorg.conf.d/99-fbturbo.conf
/usr/share/X11/xorg.conf.d/99-calibration.conf
/usr/share/X11/xorg.conf.d/10-evdev.conf
Someone have a ideas to suggest ?
Thanks
Thor could you share your complete configuration and step by step guide when something different from circuitbasics one, I’ve sku tft lcd 3.2 (v4.1) too and i’ve no success making it working :(
Narco, the process step by step is really long, so, my first installation is a subsequences of many tries and I don’t know what i exactly do. So I followed this tutorial some weeks ago, and all go right. So with last update of kernel, some change was needed to make the touch working again. So I restarted from scratch using a rasbpian customized image from here: http://www.amazon.com/SainSmart-Module-Screen-Display-Raspberry/dp/B00OPZNI3M
This install a really clean and fast distort, with full working display and touch, at the first try, without do nothing.
I suggest to start with this image, then personalize it as you like.
Ciao
distort = distro damn corrector….
Also…. The only thing I need is to use this display with touch screen with a python environment with framebuffer graphic system and not X. So at the moment I never found the right way to use this display/touch as I need. The touchscreen work fine and it is calibrated in a X mode, but when I’m out from X in framebuffer, there are no way to get the touch calibrated ad tried any solution to fix it without success… So for the moment I continue to search a good solution.
Hi Thor,
I am having the exact same problem right now. Googling internet around all day and finally was led to your post… I am wondering if you have figured out how to do it already. Please let me know!! much appreciated
Hi Thor,
I have noticed that the calibration only works specifically for X. I think that may be the source of some peoples problems with it. Unfortunately I’m not sure how to calibrate it with a framebuffer graphics system, maybe someone else here knows?
amigos con esta imagen funcion mi lcd 3.2” washared spotpear V4
https://yadi.sk/d/MqEusRptgZYsC
es para raspberry PI2
https://yadi.sk/d/MqEusRptgZYsC
i did all the steps everything is working however im using retro pie and everything boots and load but the UI only shows in hdmi mode not on my tft 3.2 screen ….by the way i have the same screen
unable to calibrate .
root@raspberrypi:/home/pi# apt-get install libts-bin
Reading package lists… Done
Building dependency tree
Reading state information… Done
The following NEW packages will be installed:
libts-bin
0 upgraded, 1 newly installed, 0 to remove and 0 not upgraded.
Need to get 0 B/33.1 kB of archives.
After this operation, 119 kB of additional disk space will be used.
Selecting previously unselected package libts-bin.
(Reading database … 77866 files and directories currently installed.)
Unpacking libts-bin (from …/libts-bin_1.0-11_armhf.deb) …
Processing triggers for man-db …
Setting up libts-bin (1.0-11) …
root@raspberrypi:/home/pi# export TSLIB_TSDEVICE=/dev/input/event0
root@raspberrypi:/home/pi# export TSLIB_FBDEVICE=/dev/fb1
root@raspberrypi:/home/pi# ts_calibrate
ts_open: No such file or directory
Great tutorial.
So far it worked out well.
Just running into following situation.
When moving finger to the right, cursor goes left. Up/down works fine.
Tried different combinations in the
DISPLAY=:0 xinput –set-prop ‘ADS7846 Touchscreen’ ‘Evdev Axis Inversion’ 1 0
ts_test works perfectly fine. Drawing and dragging just works fine.
Any suggestions appreciated
Having the exact same issue as NoBadDaysInSD. ts_calibrate and ts_test work fine. But X axis is still inverted after exiting/rebooting. Changing xinitrc seems to have absolutely no effect. Waveshare V4 on RP2.
Found some details on http://blog.rot13.org/2013/12/touch-screen-configuration-using-xinput.html which is getting me further.
Using ‘xinput list’, I found my touchscreen has an ID of 6. Then using ‘xinput list-props 6’ (6 being the id I found before, I looked for “Evdev Axis Inversion” and noted the ID (239 in my case).
I then ran ‘xinput set-prop 6 239 1 0’, and the X axis started behaving (moving stylus to the left moved the cursor to the left). I put this in xinitrc, but again it seems to ignore this file when starting X.
Found the fix, check out https://www.raspberrypi.org/forums/viewtopic.php?t=48967
Had to add Option “InvertY” “true” to the touchscreen input class.
Thanks for all help on this page and some of the comments here. My system consists of RPi model B with 1GByte RAM, 8GByte Micro-SD card, Linux raspberrypi 4.0.7-v7+, WaveShare SpotPear 3.2 inch LCD (V3). Screen/touch rotation as well as calibration works fine now. The keys are working fine too :) This page with some of the comments that followed was of particular great help for getting the 3.2 inch LCD working: https://circuitbasics.com/Staging/setup-lcd-touchscreen-raspberry-pi/
after stage 3, when rebooted the screen would only work if also connected to hdmi. Any solutions?
Hi, I am a Korean
Found through Google Translator
This guide is perfect
I did as guide
but, The problem occurred to me
This comes as a vertical direction of the touch
I am being used to screen 270 degrees.
Whether touch is rotated 270.
I do not know.Please teach me.
Resolved…
Hi,
I am using the same LCD and followed your tutorial. Have your tested the guide lately? Are you certain that it works? I see the boot messages on console but I get white screen as GUI starts.
Below is the /var/log/messages after reboot. Could you please help?
Oct 16 17:38:48 spare kernel: [ 11.653936] fbtft: module is from the staging directory, the quality is unknown, you have been warned.
Oct 16 17:38:48 spare kernel: [ 11.691425] fbtft_device: module is from the staging directory, the quality is unknown, you have been warned.
Oct 16 17:38:48 spare kernel: [ 11.722872] fbtft_device: SPI devices registered:
Oct 16 17:38:48 spare kernel: [ 11.732559] fbtft_device: spidev spi0.0 500kHz 8 bits mode=0x00
Oct 16 17:38:48 spare kernel: [ 11.741603] fbtft_device: spidev spi0.1 500kHz 8 bits mode=0x00
Oct 16 17:38:48 spare kernel: [ 11.750250] fbtft_device: ‘fb’ Platform devices registered:
Oct 16 17:38:48 spare kernel: [ 11.758218] fbtft_device: soc:fb id=-1 pdata? no
Oct 16 17:38:48 spare kernel: [ 11.765443] fbtft_device: Deleting spi0.0
Oct 16 17:38:48 spare kernel: [ 11.774787] fbtft_device: GPIOS used by ‘waveshare32b’:
Oct 16 17:38:48 spare kernel: [ 11.797819] fbtft_device: ‘dc’ = GPIO22
Oct 16 17:38:48 spare kernel: [ 11.804016] fbtft_device: ‘reset’ = GPIO27
Oct 16 17:38:48 spare kernel: [ 11.817202] fbtft_device: SPI devices registered:
Oct 16 17:38:48 spare kernel: [ 11.824518] fb_ili9340: module is from the staging directory, the quality is unknown, you have been warned.
Oct 16 17:38:48 spare kernel: [ 11.838570] fbtft_device: spidev spi0.1 500kHz 8 bits mode=0x00
Oct 16 17:38:48 spare kernel: [ 11.847045] fbtft_device: fb_ili9340 spi0.0 48000kHz 8 bits mode=0x00
Oct 16 17:38:48 spare kernel: [ 12.544859] graphics fb1: fb_ili9340 frame buffer, 320×240, 150 KiB video memory, 4 KiB DMA buffer memory, fps=50, spi0.0 at 48 MHz
Oct 16 17:38:48 spare kernel: [ 15.047752] random: nonblocking pool is initialized
Oct 16 17:38:48 spare kernel: [ 21.773644] smsc95xx 1-1.1:1.0 eth0: hardware isn’t capable of remote wakeup
Oct 16 17:38:48 spare kernel: [ 23.233722] smsc95xx 1-1.1:1.0 eth0: link up, 100Mbps, full-duplex, lpa 0x4DE1
Oct 16 17:38:48 spare kernel: [ 26.731487] cfg80211: Calling CRDA to update world regulatory domain
Oct 16 17:38:51 spare kernel: [ 31.201111] Adding 102396k swap on /var/swap. Priority:-1 extents:2 across:2134012k SSFS
hai..
i am using raspberry pi 2 and waveshare 3.2 inch lcd. its all working fine.
but the X axis is inverted after booting.
Requesting you to provide necessary steps…
Thanks in advance….
To change X axis behavior I created new section in 99-fbturbo.conf:
Section “InputClass”
Identifier “VaihdaXY”
MatchProduct “ADS7846 Touchscreen”
Option “InvertX” “1”
EndSection
Works like a charm. Otherwise I followed the excellent instructions. Thanks!
BTW “VaihdaXY” can be anything, like SwitchXY.
Can these same instructions be used for waveshare 3.5inch LCD spotpear.
i have an osoyoo 3.5 inch touchscreen. it came with some raspbian version there (the only one that works with it) but the colors are like inverted… some help would be greatly apreciated
After poweroff the screen remain white how ca i fix that?
thanks for the great tutorial
Great tutorial, congratulations! However, I can not get out of the clamp at all … ctrl + c does not work
Doesn’t appear to work with the Elegoo 3,5″ Touchscreen. The output is fine but only the touch input is 90° rotated it seems and I have no idea how to fix this.
I use a 7 inch touchscreen display for my raspberry pi 3. I had to rotate the screen 180 degrees but now the touchscreen axis is backwards, please help.
Thanks a lot!
Very accurate description of the process. Piece of cake now to get my 5″ cheapo chinese TS to work.
Mine listened on /dev/fb0 however, easy fix because it was the only fb device present.
Will this calibrate an acer t232hl?
Hello,
Respected Sir,
When I am graphics program run in raspberry pi then there’s no problem in touch.but when I’m run this graphics program at boot time using desktop to cLi mode then this pointer is not correspond with my finger.
Please Help.