
The Raspberry Pi Zero’s small size isn’t the only thing that makes it an awesome single board computer. Thanks to its ability to be recognized as a USB/Ethernet gadget, you can connect to your Pi from another computer via USB. Power is provided over USB, and your computer’s internet connection is shared over USB too. You no longer need to use a power cord and ethernet cable or WiFi adapter to access your Pi. All that’s needed is a micro USB to USB adapter.

In the past, a serial debugging adapter was needed to configure the Pi as a USB/Ethernet gadget, but with Raspbian Jessie 5-10-16 or later, all you need to do is edit a couple files on the SD card.
This tutorial is based in Windows. You’ll need to install a program called Bonjour on your computer before you can connect to the Pi over USB. Bonjour allows your computer to automatically recognize USB and ethernet devices like printers, scanners, and in this case the Raspberry Pi. Bonjour is packaged with iTunes and Adobe CS software, so it might already be installed on your computer. If it’s not though, you can download and install the stand-alone software here.
This tutorial assumes that you have the SSH client PuTTY already installed on your computer.
Here’s the video version of the tutorial:
Edit the config.txt and cmdline.txt Files
To get started, burn a fresh image of Raspbian Jessie Full or Lite (version 5-10-16 or later) to a micro SD card on your laptop/desktop (see our tutorial How to Set Up a Raspberry Pi Without a Monitor or Keyboard if you need help with this step):

Once that’s finished, navigate to the root directory of the micro SD card (i.e. boot (E:)) and open the file config.txt with Wordpad. Using Notepad to edit the file will make it hard to tell where the line breaks are, and this file uses line breaks to separate the commands. Scroll down to the bottom of the file and add dtoverlay=dwc2 to a new line:
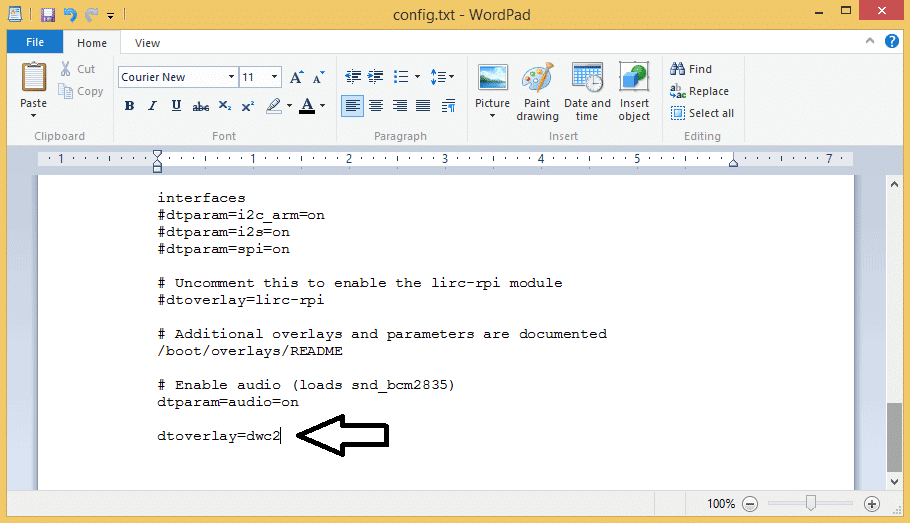
Save and exit the config.txt file.
Now open the cmdline.txt file with Notepad. Make sure “Word Wrap” is off to view the file as a single line. You don’t want to add any line breaks to this file. All of the commands need to be in a single line. If you use Wordpad to edit this file, you may create unintentional line breaks, so using Notepad is best. Scroll across the line and find the command rootwait. After the rootwait command, add modules-load=dwc2,g_ether:
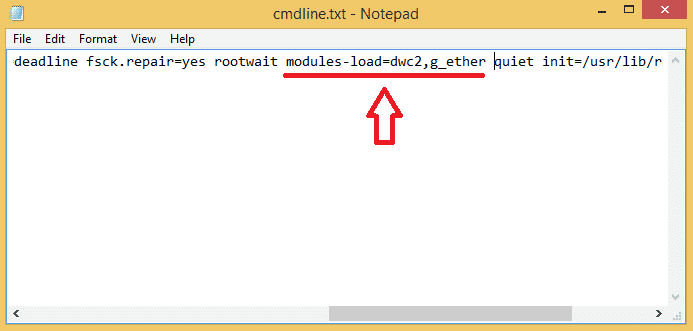
Save and exit the cmdline.txt file.
Now you can eject the SD card from your computer.
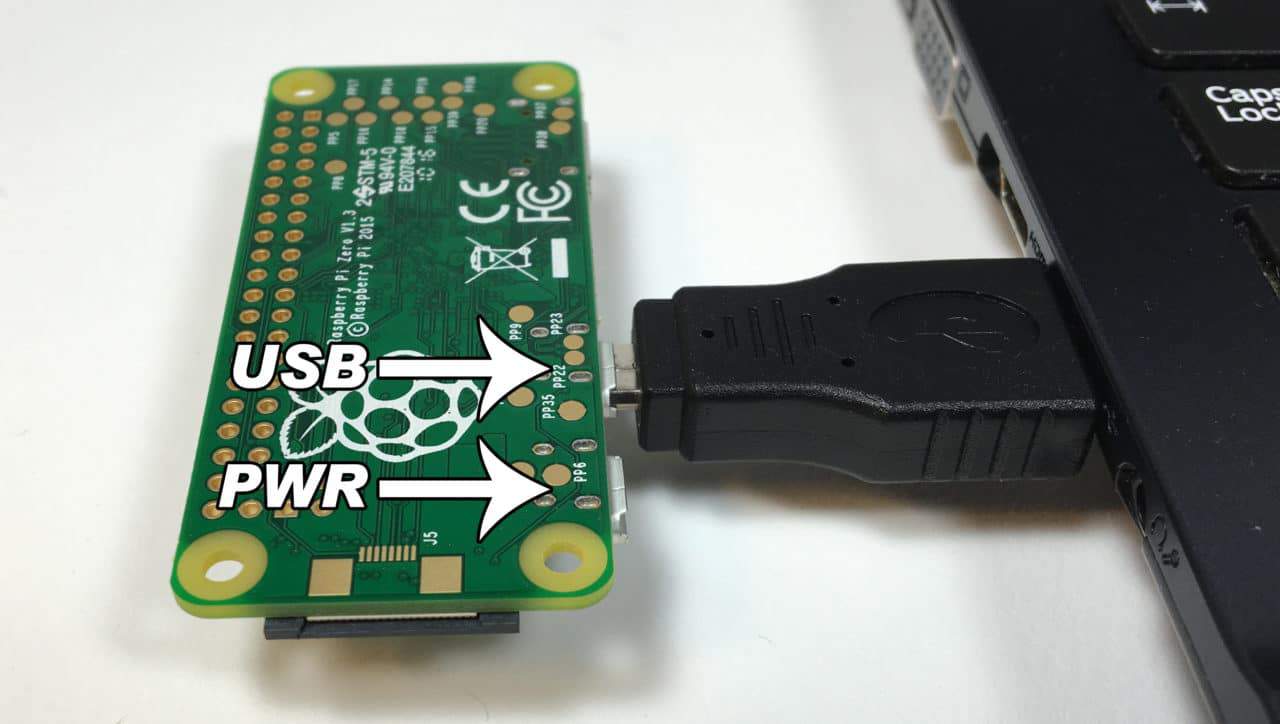
Insert your SD card into the Pi Zero, and plug your micro USB to USB adapter (or cable) into the Pi’s micro USB port (not the power connection), and the other end into your computer:
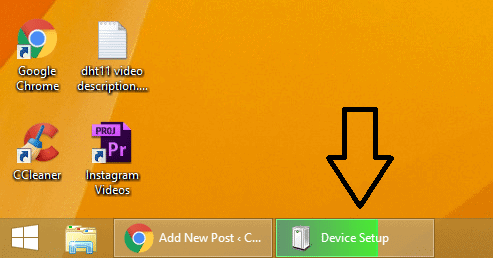
You’ll see that Windows recognizes the Pi, and will attempt to setup the device:
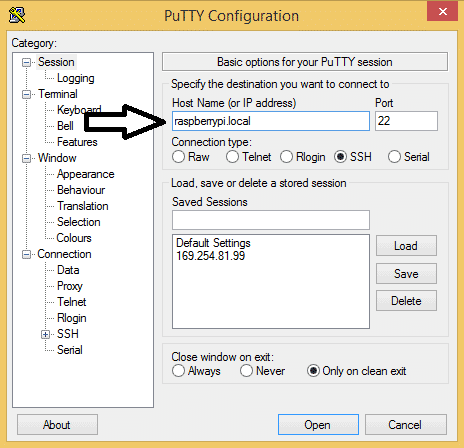
At this point, open PuTTY and try SSHing into the Pi with the address raspberrypi.local:
If you can log in to your Pi at this point, that’s good. You can skip the next section, “Install the RNDIS Drivers” and go to the “Setting Up Shared Internet Access” further below.
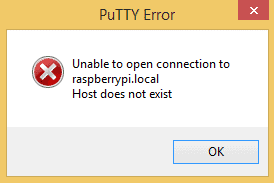
If you do get an error message saying something like “Unable to open connection to raspberrypi.local. Host does not exist”, you’ll just need to install the RNDIS drivers on your computer. I’ll explain how to do this in the next section:
Install the RNDIS Drivers
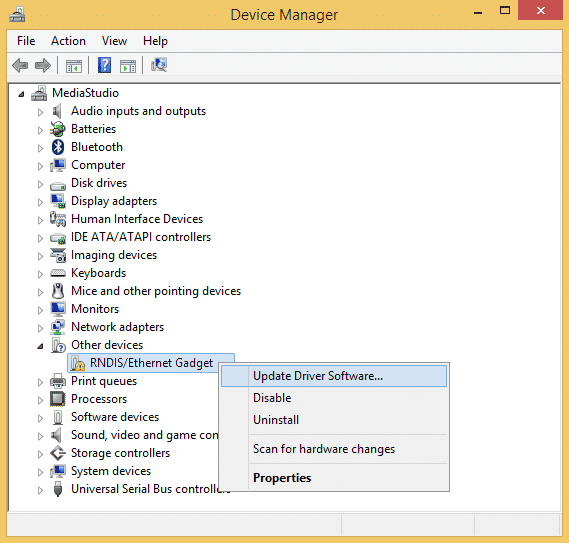
With your Pi Zero still connected to your computer, navigate to the Windows Device Manager. Under “Other devices” find “RNDIS/Ethernet Gadget”, and right click on it. Then click “Update driver software” from the menu:
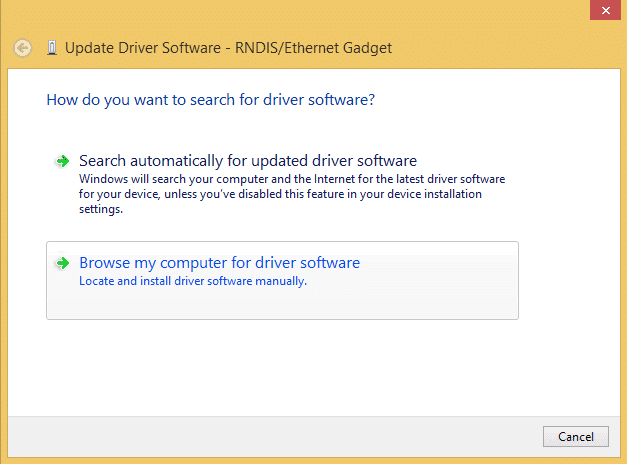
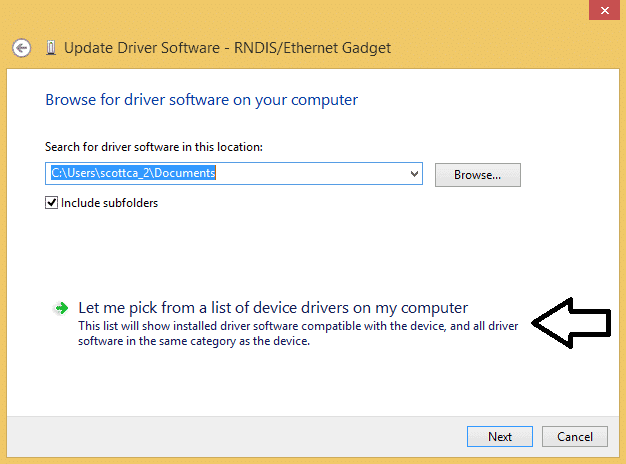
In the next window, select “Browse my computer for driver software”:
Now click “Let me pick from a list of device drivers on my computer”:
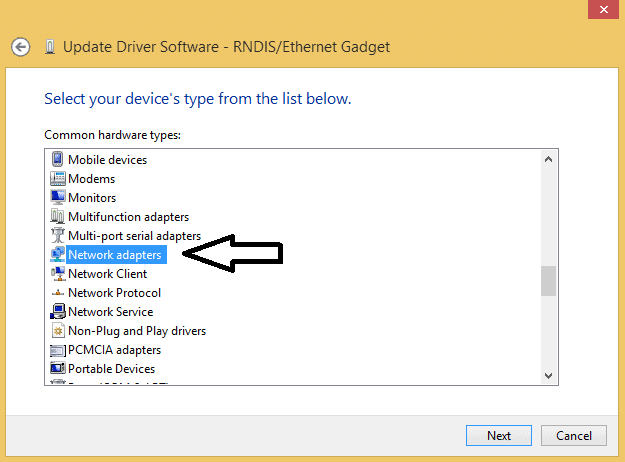
Scroll down the list and select “Network adapters”, then click Next:
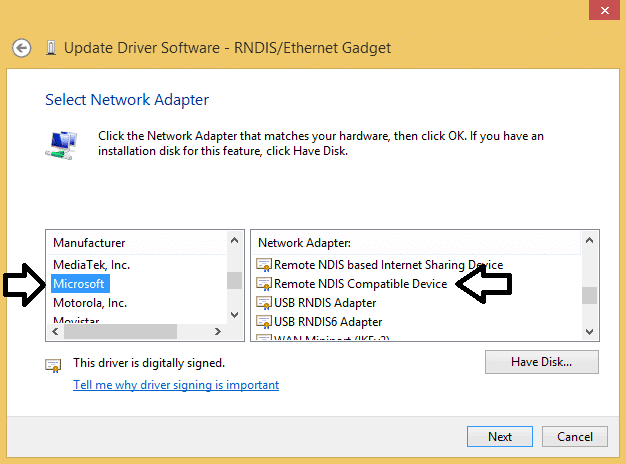
Now scroll down the “Manufacturers” list in the window on the left, and select “Microsoft”. Then scroll down the “Network Adapters” list on the right side window until you find a line that says “Remote NDIS Compatible Device”. Select that, then click Next:
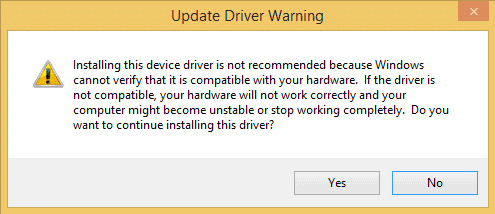
A warning will pop up about Windows not being able to verify the driver, but just click “Yes” to get past it:
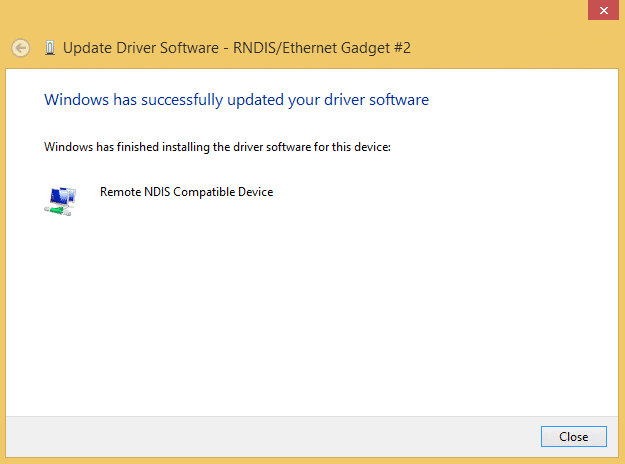
After the driver is finished installing, you should see something like this:
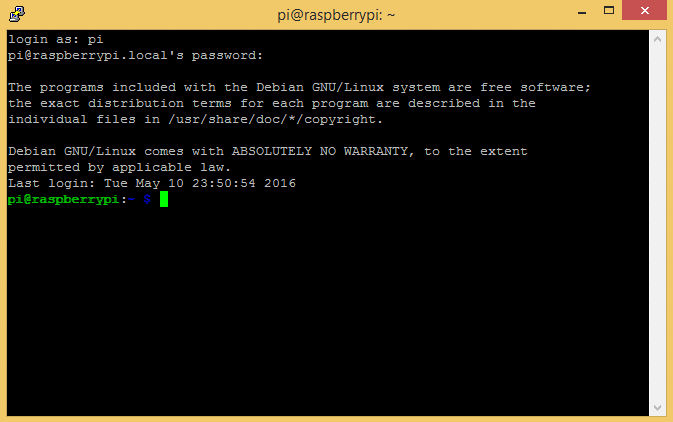
Now try to log into your Pi with PuTTY using the address raspberrypi.local. You should be able to get in:
At this point, you should run sudo raspi-config to expand the file system. When that’s done, reboot the Pi with sudo reboot.
After the reboot, if you log back in with PuTTY you can check to see if it has internet access by entering sudo ping www.google.com at the command prompt. You will probably get an error that says “ping: unknown host www.google.com” or something similar. In the next section, I’ll show you how to give the Pi access to your computer’s internet connection.
Setting Up Shared Internet Access
To share your computer’s internet connection with the Pi, we need to allow network sharing on one of your computer’s network connections.
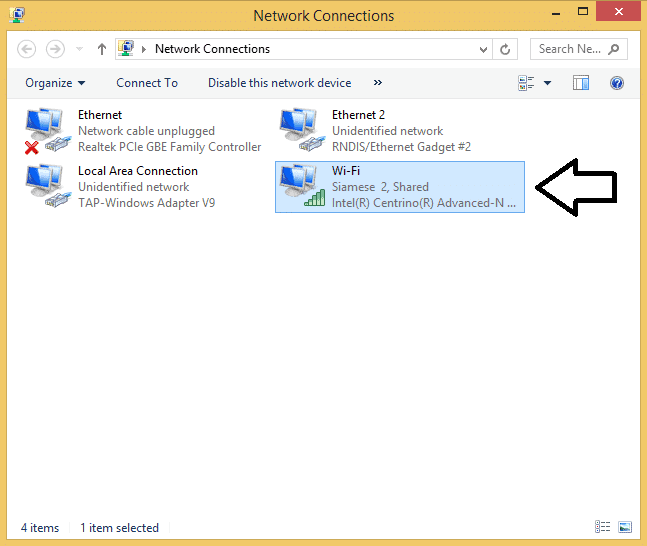
With your Pi Zero plugged in and powered on, navigate to the “Network Connections” window:
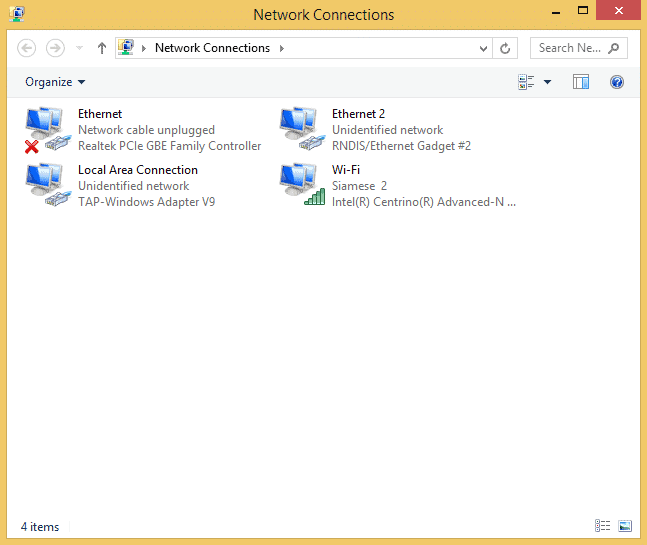
Your Pi will show up as a separate network connection. It will say “RNDIS/Ethernet Gadget” under the connection name. In my case, it’s “Ethernet 2”.
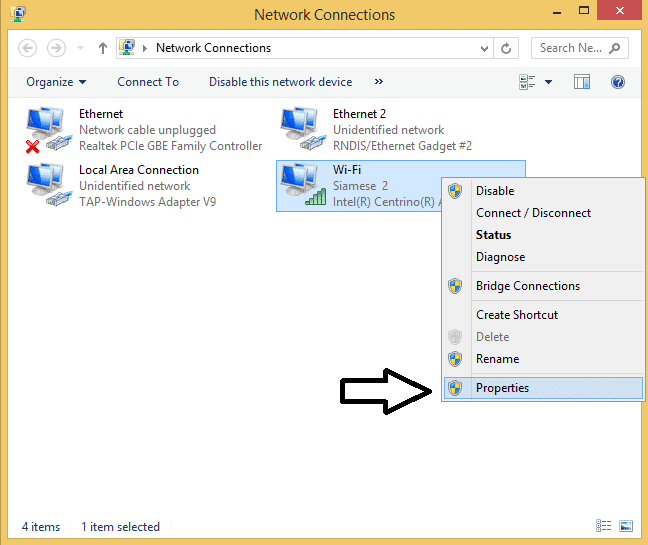
Now you should decide which connection you want your Pi to access the Internet over (i.e. WiFi or Ethernet). I want my Pi to access the internet over my computer’s WiFi connection, so I’ll need to enable my WiFi connection to allow sharing. Right click on the connection you want to use, then select “Properties”:
In the WiFi Properties window, click on the “Sharing” tab:
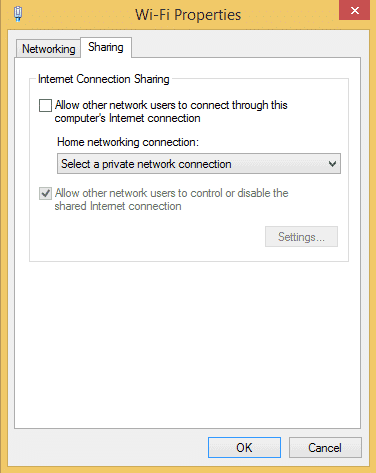
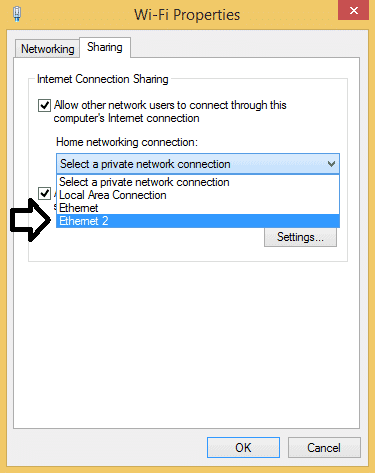
Click the box that says “Allow other network users to connect through this computer’s Internet connection”, then click the drop down menu below that. Find the network connection given to your Pi (Ethernet 2 in my case), select it, then click OK:
The network you chose to share access with your Pi will show the name of your WiFi network, followed by “Shared” in the “Network Connections” window :
Now reboot your Pi and log back into it with PuTTY.
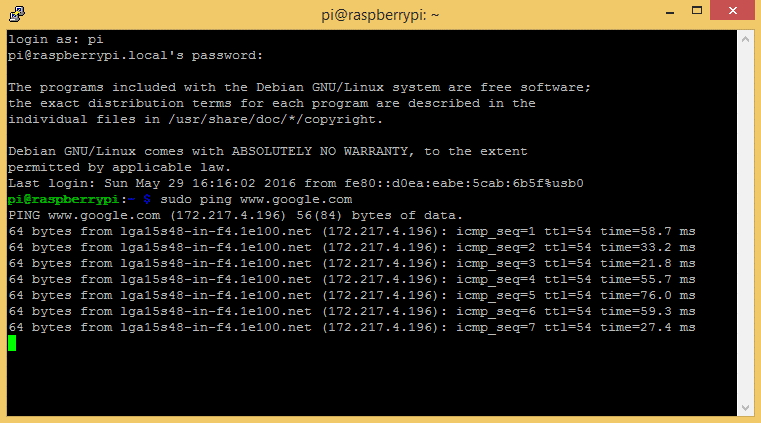
Enter ifconfig at the command prompt, and you should see a usb0 connection showing TX and RX packets being sent and received:
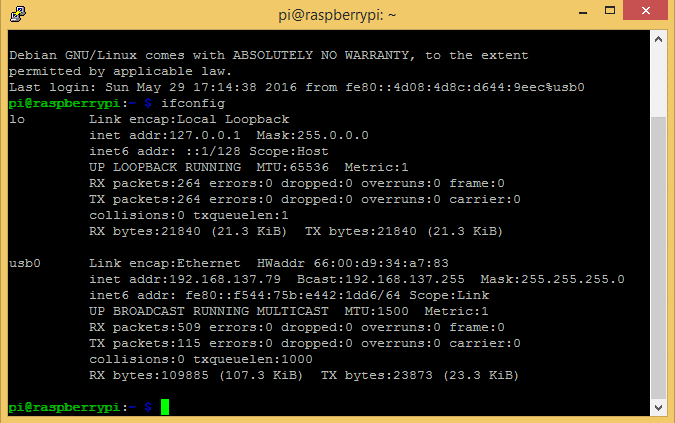
Enter sudo ping www.google.com to test the connection further, and you should see that your Pi has internet access!
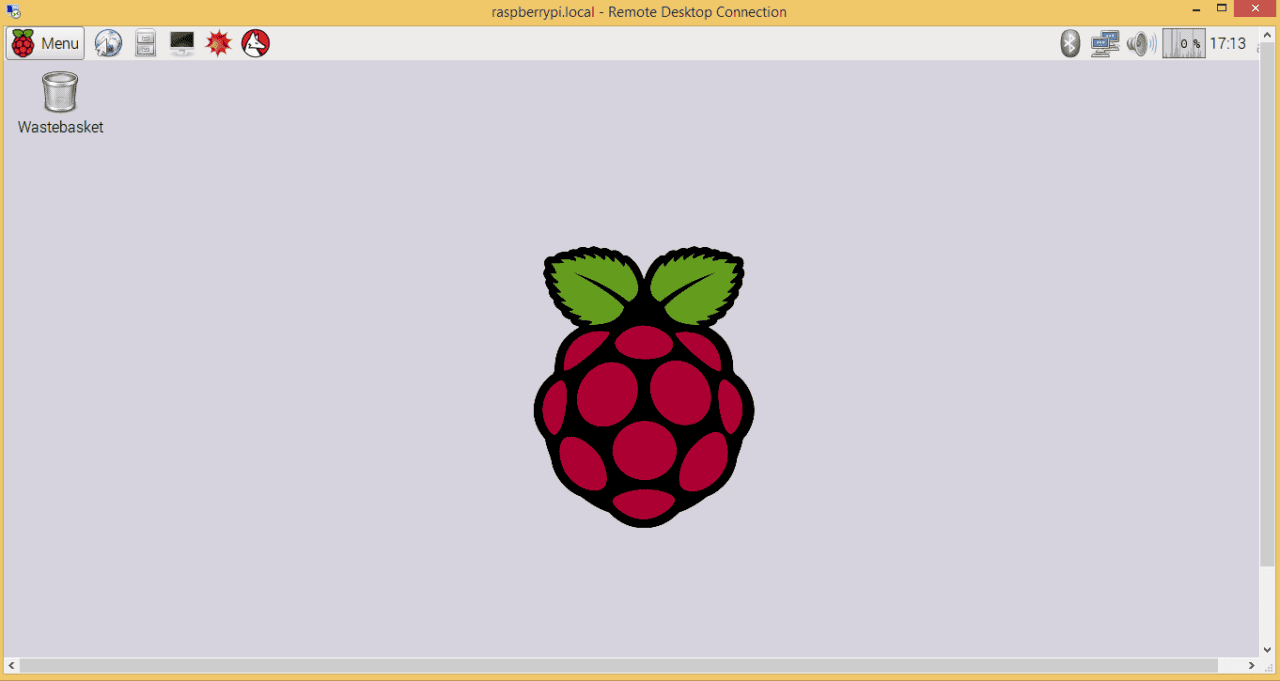
If you want to access the Raspbian Desktop, you’ll need to install an RDP (remote desktop protocol) client first. I like XRDP, but there are several others you can use depending on your preference. To install XRDP, enter sudo apt-get install xrdp at the command prompt. After the installation is finished, reboot the Pi.
Now you should be able to access the Raspbian Desktop with the Windows “Remote Desktop Connection” utility by logging in with the address raspberrypi.local:
Setting up your Raspberry Pi Zero as a USB/Ethernet gadget will let you get internet access and power over a single USB connection. Just plug it into your computer and you’re ready to go. It makes the Pi extremely portable, as there’s no need to carry around a power cord and ethernet cable or WiFi adapter. This is by far the easiest and most convenient way to access your Pi!
I hope you found this article helpful and were able to set it up! Let us know in the comments if you have any questions or problems, and be sure to subscribe to Circuit Basics if you want to get more articles like this!


Anyone got a tutorial for this for Linux? Looks way easier than connecting it to my phone and having to use my phone to access the ssh shell and vnc window.
I agree!
Have you tried it yet? If you follow the pi setup instructions and then plug it in what happens? If you can then ssh to it, try enable ip_fwd on the host machine
Here’s the original blog on it – Linux / Mac requires a Lot LESS tinkering , last time I tried literally Plug’nPlay after modding config. & cmdline. files
http://blog.gbaman.info/?p=699
might be useful to say (at least to a noob like me) that in order for the rdp to work, one must enable a desktop on the pi zero :-|
while ‘sudo raspi-config’ to expand filesystem, also go to boot settings and select the desktop setting.
I still get: connect: Network is unreachable and ping: unknown host http://www.google.com. The Ethernet (RPI) is set to get the ip automatic. Please help.
hi, i realized i am replying to the old message. But, I am experiencing the same problem and fixed by setup not ip automatic, instead use static. For the IP static, check with ip address on pi, for example on pi : 192.168.137.67 , then in windows, you have to set static as 192.168.137.1 and default DNS, other than that just leave empty.
hope this help others in the future!
Pi4 Buster
Do it by trying and retrying. I was using a Jessie Lite and now I’ve installed a Full Jessie and it is working. Thank you.
This works with Jessie Lite as well. I had to spend more time with Windows which I presume was because I am using Win7.
Everything works great thus far. The only problem is I would like to be able to SSH to the PiZero from another computer within the network. Would this be possible?
I have a issue where the pi will not connect to the shared network. My main pc is connected to a secure Wireless access point and the pi can ping 8.8.8.8 but not http://www.google.com
I have made sure the pi is set to dhcp lookup and the usb0 connection is in the interfaces file.
Any ideas that I could try? Much thanks.
When pinging Google (or any other site), leave off the “http://”.
Also try to disconnect and reconnect the wifi.
Try to unchecked shared connection >ok then check shared connection> ok. Then wait 1-2min and try to ping.
I repeatedly have tried this. Fine it works first time. However I cannot ping internet addresses. I can SSH into it. I try to share network on my Windoze 10 machine -W10 is showing part of HOME network and I do have a home group set up. The ZERO network connection says NO INTERNET connection and that it is PUBLIC. I can’t change it. Not only that. If I take down the Windows 10 a HP 8000 desktop, upon rebooting I get a BSOD and a “WDF-VIOLATION then a reboot loop back to the BSOD in a loop I remove the PI ZERO and it boots just fine. Plug in the the ZERO and BSOD— unless I re-image my micro SD card. I have tried 2 micro SD cards.. This machine is my only Windows 10 machine. microSD is class 10 16Gb. I have a class 4 8Gb card coming. I have 2 Windoze 7 machines which I can’t blow up and a Windows home server 2011 machine. The remainder only test bed machine I have I rolled on Windows 10 last month so I can blow up all I want. If I repeat all the above, It works 1st time not internet. bot the W10 and back to BSOD loop..My W10 drivers are all current, all updates current. Does this work on W10 machines?? Any help??? PS- I am A+, server+, Network+ certified. 3 months total experience with Windoze 10. I have a RPI B+ a 3 in the box. Wanted to try the ZERO it is V1.3.
Can you do this without reinstalling? Can you both boot normally and attach to usb?
Thanks for the wonderful tutorial.
Unfortunately, my RPi keeps showing up as a COM-port serial device, rather than an ethernet one :-(
Any idea how to fix that?
I would try doing the “Install the RNDIS Drivers” again. Without this driver, the USB port will show up as a COM port.
I have the same problem, but the part with “Install the RNDIS Drivers” does not work because you don’t have the option to select network drivers (as it is a COM device, only allowing different COM drivers) – Windows 10 x64
see this link https://forums.raspberrypi.com/viewtopic.php?t=245184
I’ve the similar issue where “? Other devices NDIS …” didn’t show up after connecting my Pi Zero to the USB port. The only legit connection is “USB Seial Port COM3” under the Ports tab with “COM & LPT”. Any suggestions?
Do you have any intention of referencing where the initial work/research for this post came from?
https://t.co/gHWk23hi7i
Hi Andrew – Just had an email notification on this post I’m a bit confused as to who the question is directed to ??
Minor note…
Using ping does NOT require sudo.
Unless you are using particular options like -i (setting an interval lover than a set threshold): –
% ping -i.1 10.6.8.10
PING 10.6.8.10 (10.6.8.10) 56(84) bytes of data.
ping: cannot flood; minimal interval allowed for user is 200ms
% sudo ping -i.1 10.6.8.10
PING 10.6.8.10 (10.6.8.10) 56(84) bytes of data.
64 bytes from 10.6.8.10: icmp_seq=1 ttl=64 time=0.165 ms
64 bytes from 10.6.8.10: icmp_seq=2 ttl=64 time=0.133 ms
64 bytes from 10.6.8.10: icmp_seq=3 ttl=64 time=0.168 ms
64 bytes from 10.6.8.10: icmp_seq=4 ttl=64 time=0.134 ms
^C
— 10.6.8.10 ping statistics —
4 packets transmitted, 4 received, 0% packet loss, time 300ms
rtt min/avg/max/mdev = 0.133/0.150/0.168/0.016 ms
Trolls need not reply. The only answer wanted is a ” ‘Here is how you do it, and it works this way the way you that asked for it. Here are the steps’ …” reply. Questions, misderections and “stop using your product” replies are useless.
I have tried a hub connected to the PiZero with the PC connected to it without success.
Is this possible? If yes, then I would be able to connect a second USB device to the PiZero.
Thanks and best regards!
Trying to hook up pi zero to win 10 I can not see any ethernet port in device manager not showing in usb either. I sure am goofing some where IU am a new bee so excuse me. Need help
Thanks
Bob
I need a link for download windows 10 driver
Great guide, I’m really looking forward to getting this working. However, I get a boot error when I add the modules to cmdline.txt
systemd-modules-load.service: main process exited, code:exited, status=1/Failure
[FAILED] Failed to start Load Kernel Modules.
I have Raspbian Jessie, installed via NOOBS on a Raspberry PiZero. I hooked up a monitor, keyboard and mouse and made the changes advised above then rebooted.
Any advice would be very appreciated
I quote:
“Now open the cmdline.txt file with Notepad. Make sure “Word Wrap” is off to view the file as a single line. You don’t want to add any line breaks to this file. All of the commands need to be in a single line. If you use Wordpad to edit this file, you may create unintentional line breaks, so using Notepad is best. Scroll across the line and find the command rootwait. After the rootwait command, add modules-load=dwc2,g_ether”
The crucial is to put “modules-load=dwc2,g_ether” right after rootwait command, and no “wordwrap” or line break i editing file (cmdline.txt). Check also is there space between commands.
New update from the Raspberry Pi foundation; now, you have to enable ssh by putting a file named ssh into /boot/ (easy access from any computer)
tutorial – access #Raspberry_Pi #PiZero over USB giving it both power and internet access. Slick! https://t.co/wDxznv2eIF
https://t.co/XqxZ60Br7W
Dude you saved my life with this guide it is so in-detail with the pictures and the explanation of what to do when things go off course. Thank you 100 times!
i did everything and it worked. i’m ssh-ing pi and pi connects to internet via my pc but there is a flaw – when i try to install something on pi via ssh, it restarts my pc. it starts downloading packages and in midway my pc reboots. can someone help me with thiu problem?
Hey,
Just an update if you are still looking for driver I was able to get some help from here: https://www.raspberrypi.org/blog/programming-pi-zero-usb/
If you install BonjourPSSetup on Windows it will find the device as “Other devices” and you can find “Remote NDIS Compatible Device” driver under “Microsoft corporation” manufacture.
Hello,
Thank you for your post. I did everything even the part ” INSTALL THE RNDIS DRIVERS ” but when I try to connect with putty I have this message : Connection refused.
Do you know why ?
Thank you
Ok Fixed after 3 reboots
How you do that, i have this same error. I can ping PiZero but I can’t connect to ssh after enable this in menu.
As mentioned by SnakeMAR,you have to enable ssh by putting a file named ssh into /boot/ (easy access from any computer)
Very nice tutorial. I like the pace for someone who is new to pizero. You mention using Bonjour, but do not explain further. I downloaded iTunes and Bonjour printer. How do I set this up to use USB OTG? Thanks advance. Lee
A bit weird because this tutorial works great on my main PC but doesn’t seem to work on my new laptop. Has anyone had issues doing this on different devices?
Turns out that I didn’t have Bonjour installed on the other device. Works like a charm!
Hello
I want to do section “install RANDIS driver” , but there is no Remote NDIS Compatible Device in Microsoft.
So, please tell me how to find Remote NDIS Compatible Device .
Which version of Windows are you talking of?
In Windows 7, for instance, there is a split: “Microsoft” and “Microsoft Corporation”.
The RNDIS drivers you are searching for can be found under “Microsoft Corporation”.
http://domotique.caron.ws/wp-content/uploads/telechargement/RPI%20Driver%20OTG.zip
It works for me
There is a new sort of USB adapter available for the Pi Zero:
http://www.zerostem.io
A good startup manual for Windows hosts is missing on the manufacturers web site and that’s why I found your site after doing a lot of search.
Great tutorial, thank you very much!
I can’t get it to work. I have windows 10 but i don’t have the rsdin drivers. I don’t get the option under other devices in the devicemanager. I do have a serial USB device on com6 but when i try to update drivers for this i can’t find a rsdin driver option. What to do?
I was struggling at the same point as many of you that are using Windows 10.
The main key for me was the following procedure:
1. Download and install “Bonjour Print Services for Windows” from the Apple Homepage
2. A RNDIS Driver can be downloaded here:
http://domotique.caron.ws/wp-content/uploads/telechargement/RPI%20Driver%20OTG.zip
3. Open Putty, SSH:
Host: raspberrypi.local
Port: 22
4. A window pops up an a login is required, password is “raspberry”
–> GREAT, IT WORKS!!!
Superbasics
Learn to build your own Smart Helmet using Raspberry Pi Zero for free on Udemy. Only a limited number of coupons are available for this offer. Enroll Now!
https://www.udemy.com/smart-emergency-alert-system-helmet/?couponCode=COUPON_U
did not start the device setup
Very shortly this web page will be famous among all blog users, due to it’s pleasant content
I can not find remote ndis compatible device driver on my windows 10 PC
Hello, wonderfull, the best tutorial ever for this complex.
I followed upto login raspberrypi.local -> host does not exist.
The automatic config IP: 169.254.102.102 -> means something works
If we use Wifi-connection with another name it works, the adress is different: 192.168.178.38
Just now I have no idea to go on
Some more details I forgot.
PC: win7 , RNDIS: windows corporation 2006 , zero W: stretch lite
I want to use the USB-putty connection to realize a local network (access point) between zero and ASUS-tablet (Android) for data streaming. Pi-cam to 10″ screen.
Ok, thanks again
Great, it works properly, awsome.
the Nokia CA 101d cable was wrong.
Hello, maybe this Tutorial could get an update from scratch for the actual RASPIAN BUSTER LITE with WINDOWS 10 64BIT
I finally get it with may searches try and error to that I can connect Putty to it, but the Desktop only allows a Login and after a few seconds I am back to the commandline… no Desktop, even as I installed lightdm :-(
i can’t even get my computer to recognize the new usb connected device.
Hey , Did you figure this out ? im having the same problem and would love some advice
Thanks for sharing this post. Basically, you get the ability to log in to the console as well as anything else you could want to do over a network connection.
You can connect to your Pi from another computer via USB.
For everyone having problems on Windows 10 with RNDIS gadget, try this link: https://caron.ws/diy-cartes-microcontroleurs/raspberrypi/pi-zero-otg-ethernet/
Worked for me!
You don’t want to add any line breaks to this file. All of the commands need to be in a single line. If you use Wordpad to edit this file, you may create unintentional line breaks, so using Notepad is best. Scroll across the line and find the command rootwait.
This reply is late but what worked for me was to use Stefan’s post and link. The other thing I had to do was to power the Pi with an external power supply first, let it boot up (90 seconds) and then use the USB adapter to connect it to the PC.
This is extremely helpful info!! Very good work. Everything is very interesting to learn and easy to understand. Thank you for giving information. https://sites.google.com/view/wwwdisneynowcomactivate
Awesome article! It is in detail and well formatted that i enjoyed reading. which in turn helped me to get new information from your blog. https://sites.google.com/view/get-amc-com-activate/
Thx for the post.
Has anyone figured out how to configure the Pi such that the correct driver is installed automatically on Windows?
This does not work, at least not on Windows 10. I tried two different Windows machines with the same result. USB RNDIS/Ethernet Gadget is not installed automatically and cannot be found by the method described above. As some other web pages suggest, you can download USB RNDIS/Ethernet Gadget drive from Internet and install it manually. Even if this steps work, in the end putty does not find raspberry.local. At Network Connections you get Network cable unplugged. Effort of several hours in vain. Maybe this method no longer works and should be removed from Internet.