The Raspberry Pi is a perfect platform to learn Python, and one of Python’s most useful applications is extracting data from webpages. In this tutorial, you will learn how to read a webpage’s contents using Python and display that data to the terminal.
Using the urllib Library
The urllib library is a built-in Python package for URL (Uniform Resource Locator) handling. It has several modules for managing URLs such as:
- urllib.request – used to open webpages
- urllib.error – used to define the exception classes from the exceptions of urllib.request
- urllib.parse – used to decompose URL strings and restructurize them
- urllib.robotparser – used to parse robot.txt files
On the other hand, urllib2, the library’s Python 2 counterpart, has minor differences but all in all similar. Both libraries offer methods for convenient web access. Since we want to use the newer python version, we will only use urllib.
To demonstrate how the library works, we will extract the temperature data from weather.com and print it on the Raspberry Pi’s terminal.
Let’s take a look at the code first.
The Code
I still find it impressive that it only takes 9 lines of code using Python to extract data from a webpage:
import urllib.request

url = "http://www.weather.com"
req = urllib.request.Request(url, headers={'User-Agent': 'Mozilla/5.0'})
html = str(urllib.request.urlopen(req).read())
templine = '<span data-testid="TemperatureValue" class="_-_-node_modules-@wxu-components-src-organism-CurrentConditions-CurrentConditions--tempValue--3KcTQ">'
stringstart = html.find(templine)
stringend = stringstart + len(templine)
print("Temperature is", html[stringend:stringend+2]+"°C")
Code Explanation
First, import the urllib.request module from the library. The easiest way to open and read a URL is by entering the function: urllib.request.urlopen('your url here'). Unfortunately, things aren’t that simple with websites today. Most sites don’t appreciate scripts harvesting their data and burdening their servers. To overcome this, you need the program to pose as an actual user by modifying the http header, specifically the User-Agent variable. Headers are bits of data that contains information about you. Often it contains the website you’re using, your credentials, and other data for authentication, caching, or simply maintaining connection.
To make your Python program look like a user accessing from a Mozilla Firefox browser, use urllib.request.Request(url, headers={'User-Agent': 'Mozilla/5.0'}). Store it inside a variable and pass it to urllib.request.urlopen to access your target webpage (in our case, the weather.com).
If you’re using an interactive shell, you can display all the HTML code to the terminal by printing the variable you store it with. I typecasted it into a string as well, so we can easily manipulate the data.
Now what do we do with all these HTML code? How do we get the temperature from thousands of lines of code?
Extracting Data from a Webpage
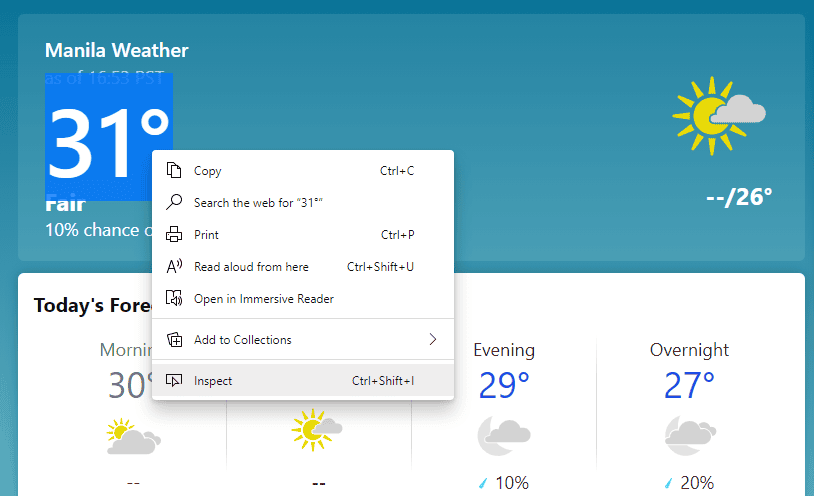
To extract the current temperature value from weather.com, go to the website. Select the text or graphic that shows the temperature value. Right-click and select Inspect. Note that this method is pure brute force. There are more ways to do this, and frankly, using an API would be much easier and reliable. However, doing it this way is a great practice and will let you understand the essentials of web scraping better.

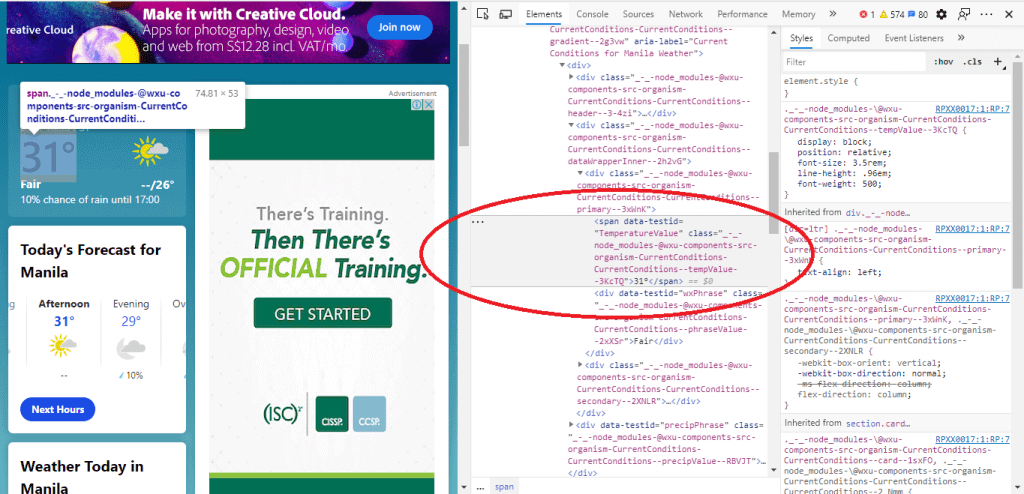
After pressing Inspect, you will see the set of code the temperature value comes from (See Figure 2). Now, copy that, and take note of the actual location of the value in the code. Figure 2 shows the value after the span element declarations. Copy that to your program as a string variable.

Next, to find that particular span element from the whole HTML code, we will use the built-in find() function. This function simply returns the location of the first occurrence of the character or string you indicated in integer form. For example, let’s look for the words “Hello World.” If you use the find function to search for the letter o, it will return 4, as the first o is located at the fifth place of the string (strings start with [0]).
After we get its location, we simply add the length of the span declaration to get the location of the temperature value. Now that we know where the value is, we can print it using the : symbol (colon). The : symbol lets you select a substring from a string by specifying the first character’s location and the last.

Finally, run the command on the terminal. The program must now extract the data from the website and display it on your terminal. You can test it anytime you want, and it will show you the current temperature on your location based on your computer’s IP address.
Using the BeautifulSoup library
import urllib.request
from bs4 import BeautifulSoup as soup

my_url2 = 'https://weather.com'
req = urllib.request.Request(my_url2, headers={'User-Agent': 'Mozilla/5.0'})
uClient2 = urllib.request.urlopen(req)
page_html2 = uClient2.read()
uClient2.close()

page_soup2 = soup(page_html2, "html.parser")
temp = page_soup2.find('div',
{"class":"_-_-node_modules-@wxu-components-src-organism-CurrentConditions-CurrentConditions--primary--3xWnK"})
print(temp.span.text)
Thanks for reading and feel free to leave a comment below if you have questions about anything!


This was a good tutorial. Thank You .
Good tutorial. Thanks.
I’m working in a system to manage energy surplus in my photovoltaic plant.
I have accés to the SMA Sunnyportal realtime data production and I’like to read the webpage contents using Python like explained in the tutorial.
Could it be possible modify the code to acces sending/introducing my username and a password?
Thank you very much.