In this tutorial, I’ll explain how to set up an LCD on an Arduino and show you all the different ways you can program it. I’ll show you how to print text, scroll text, make custom characters, blink text, and position text. They’re great for any project that outputs data, and they can make your project a lot more interesting and interactive.
The display I’m using is a 16×2 LCD display that I bought for about $5. You may be wondering why it’s called a 16×2 LCD. The part 16×2 means that the LCD has 2 lines, and can display 16 characters per line. Therefore, a 16×2 LCD screen can display up to 32 characters at once. It is possible to display more than 32 characters with scrolling though.
The code in this article is written for LCD’s that use the standard Hitachi HD44780 driver. If your LCD has 16 pins, then it probably has the Hitachi HD44780 driver. These displays can be wired in either 4 bit mode or 8 bit mode. Wiring the LCD in 4 bit mode is usually preferred since it uses four less wires than 8 bit mode. In practice, there isn’t a noticeable difference in performance between the two modes. In this tutorial, I’ll connect the LCD in 4 bit mode.
Watch the video for this tutorial here:
Connecting the LCD to the Arduino
Here’s a diagram of the pins on the LCD I’m using. The connections from each pin to the Arduino will be the same, but your pins might be arranged differently on the LCD. Be sure to check the datasheet or look for labels on your particular LCD:
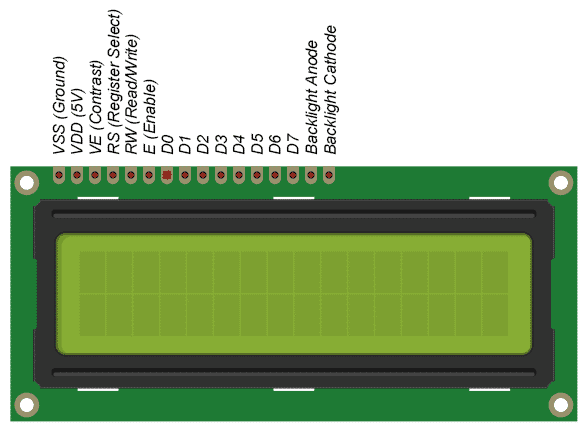
Also, you might need to solder a 16 pin header to your LCD before connecting it to a breadboard. Follow the diagram below to wire the LCD to your Arduino:
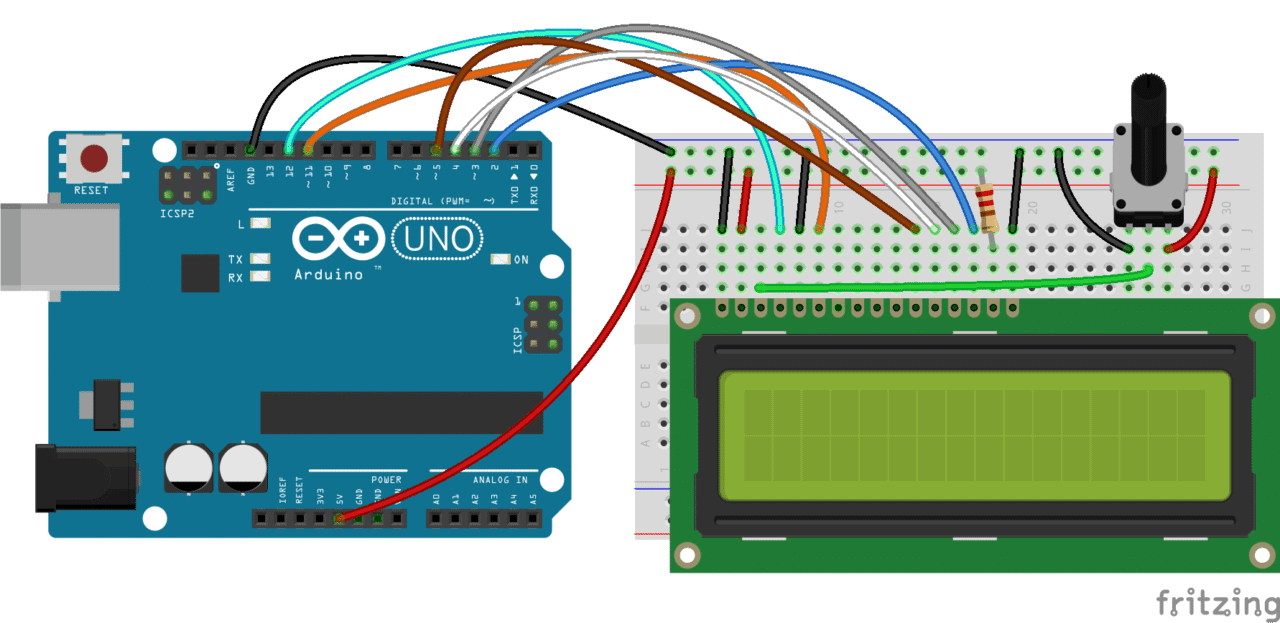
The resistor in the diagram above sets the backlight brightness. A typical value is 220 Ohms, but other values will work too. Smaller resistors will make the backlight brighter.
The potentiometer is used to adjust the screen contrast. I typically use a 10K Ohm potentiometer, but other values will also work.
Here’s the datasheet for the 16×2 LCD with all of the technical information about the display:
Programming the Arduino
All of the code below uses the LiquidCrystal library that comes pre-installed with the Arduino IDE. A library is a set of functions that can be easily added to a program in an abbreviated format.
In order to use a library, it needs be included in the program. Line 1 in the code below does this with the command #include <LiquidCrystal.h>. When you include a library in a program, all of the code in the library gets uploaded to the Arduino along with the code for your program.
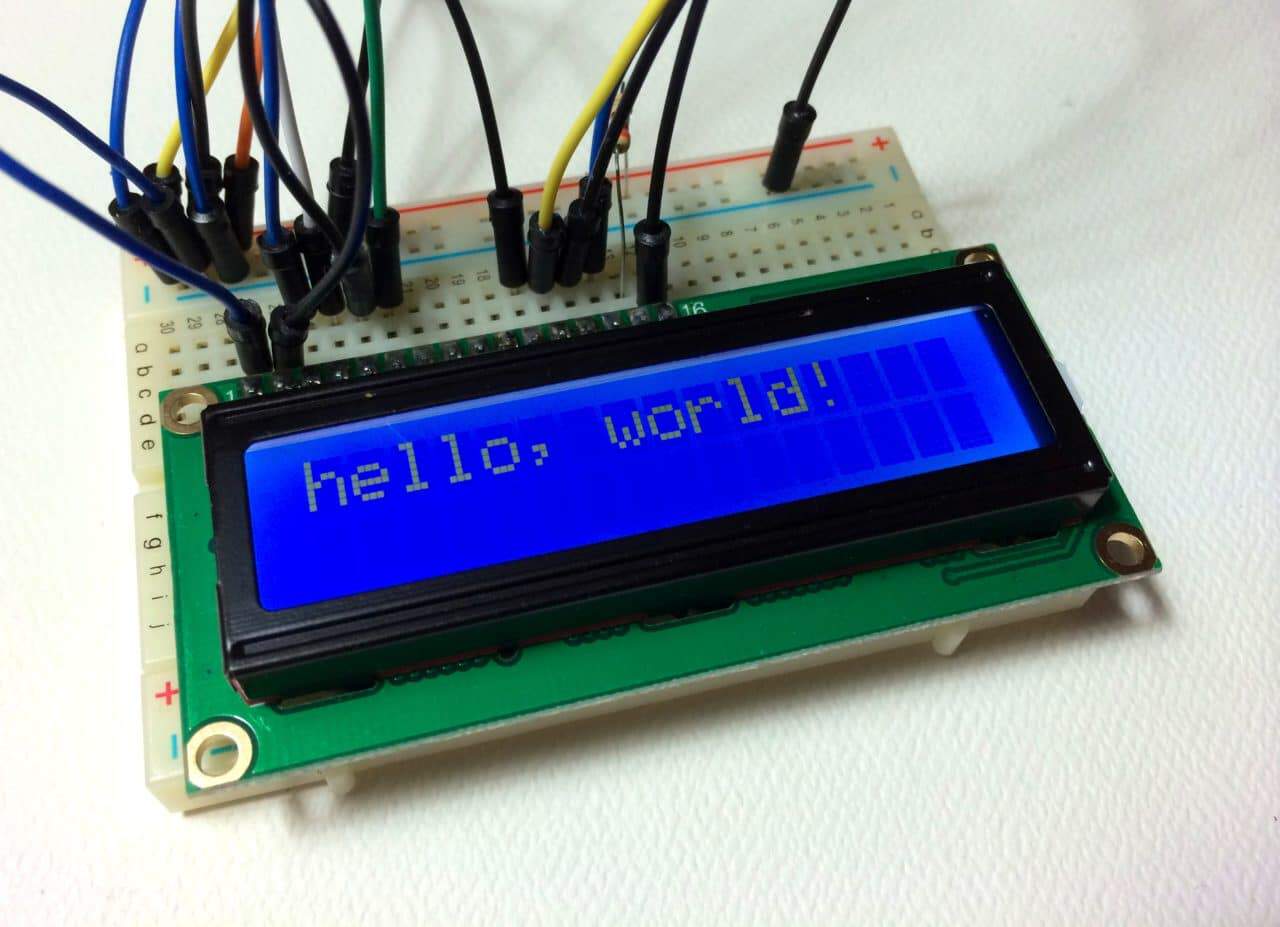
Now we’re ready to get into the programming! I’ll go over more interesting things you can do in a moment, but for now lets just run a simple test program. This program will print “hello, world!” to the screen. Enter this code into the Arduino IDE and upload it to the board:
#include <LiquidCrystal.h>

LiquidCrystal lcd(12, 11, 5, 4, 3, 2);

void setup() {
  lcd.begin(16, 2);
  lcd.print("hello, world!");
}

void loop() {
}
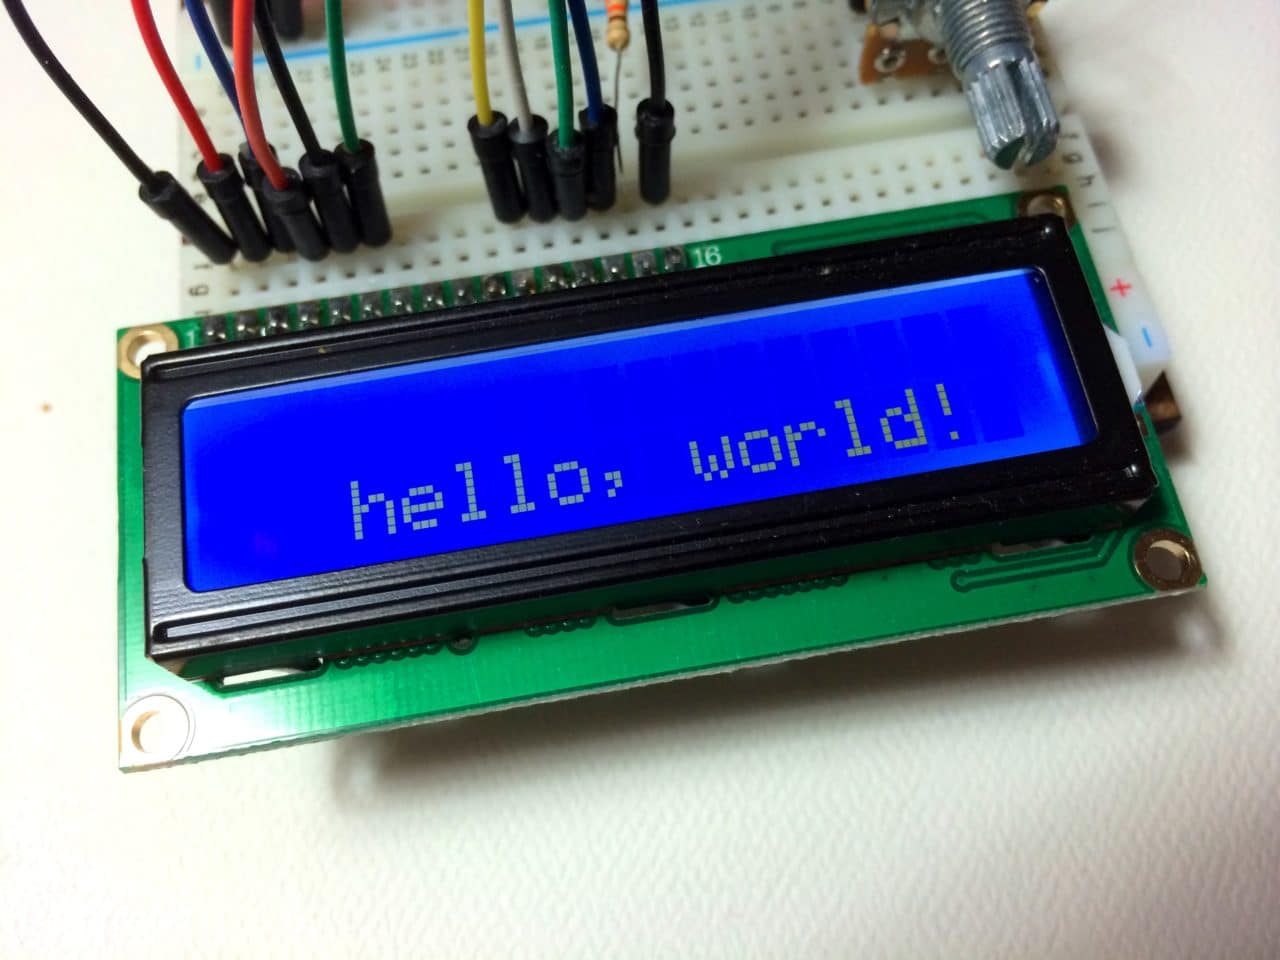
Your LCD screen should look like this:
LCD Display Options
There are 19 different functions in the LiquidCrystal library available for us to use. These functions do things like change the position of the text, move text across the screen, or make the display turn on or off. What follows is a short description of each function, and how to use it in a program.
LiquidCrystal()
The LiquidCrystal() function sets the pins the Arduino uses to connect to the LCD. You can use any of the Arduino’s digital pins to control the LCD. Just put the Arduino pin numbers inside the parentheses in this order:
LiquidCrystal(RS, E, D4, D5, D6, D7)
RS, E, D4, D5, D6, D7 are the LCD pins.
For example, say you want LCD pin D7 to connect to Arduino pin 12. Just put “12” in place of D7 in the function like this:
LiquidCrystal(RS, E, D4, D5, D6, 12)
This function needs to be placed before the void setup() section of the program.
lcd.begin()
This function sets the dimensions of the LCD. It needs to be placed before any other LiquidCrystal function in the void setup() section of the program. The number of rows and columns are specified as lcd.begin(columns, rows). For a 16×2 LCD, you would use lcd.begin(16, 2), and for a 20×4 LCD you would use lcd.begin(20, 4).
lcd.clear()
This function clears any text or data already displayed on the LCD. If you use lcd.clear() with lcd.print() and the delay() function in the void loop() section, you can make a simple blinking text program:
#include <LiquidCrystal.h>

LiquidCrystal lcd(12, 11, 5, 4, 3, 2);

void setup() {
  lcd.begin(16, 2);
}

void loop() {
  lcd.print("hello, world!");
  delay(500);
  lcd.clear();
  delay(500);
}
lcd.home()
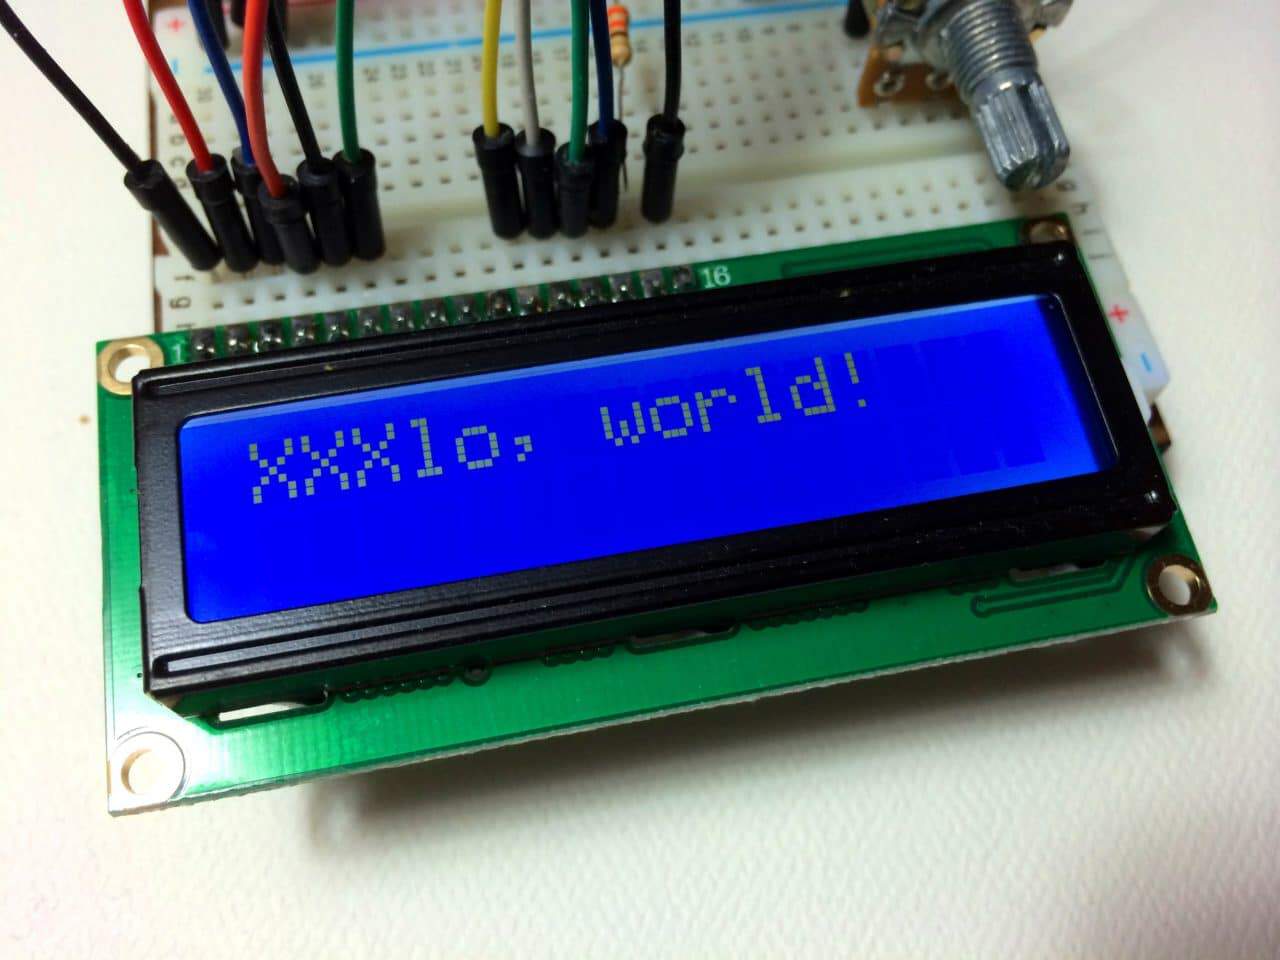
This function places the cursor in the upper left hand corner of the screen, and prints any subsequent text from that position. For example, this code replaces the first three letters of “hello world!” with X’s:
#include <LiquidCrystal.h>

LiquidCrystal lcd(12, 11, 5, 4, 3, 2);

void setup() {
  lcd.begin(16, 2);
  lcd.print("hello, world!");
}

void loop() {
  lcd.home();
  lcd.print("XXX");
}
lcd.setCursor()
Similar, but more useful than lcd.home() is lcd.setCursor(). This function places the cursor (and any printed text) at any position on the screen. It can be used in the void setup() or void loop() section of your program.
The cursor position is defined with lcd.setCursor(column, row). The column and row coordinates start from zero (0-15 and 0-1 respectively). For example, using lcd.setCursor(2, 1) in the void setup() section of the “hello, world!” program above prints “hello, world!” to the lower line and shifts it to the right two spaces:
#include <LiquidCrystal.h>

LiquidCrystal lcd(12, 11, 5, 4, 3, 2);

void setup() {
  lcd.begin(16, 2);
  lcd.setCursor(2, 1);
  lcd.print("hello, world!");
}

void loop() {
}
lcd.write()
You can use this function to write different types of data to the LCD, for example the reading from a temperature sensor, or the coordinates from a GPS module. You can also use it to print custom characters that you create yourself (more on this below). Use lcd.write() in the void setup() or void loop() section of your program.
lcd.print()
This function is used to print text to the LCD. It can be used in the void setup() section or the void loop() section of the program.
To print letters and words, place quotation marks (” “) around the text. For example, to print hello, world!, use lcd.print("hello, world!").
To print numbers, no quotation marks are necessary. For example, to print 123456789, use lcd.print(123456789).
lcd.print() can print numbers in decimal, binary, hexadecimal, and octal bases. For example:
lcd.print(100, DEC)prints “100”;lcd.print(100, BIN)prints “1100100”lcd.print(100, HEX)prints “64”lcd.print(100, OCT)prints “144”
lcd.cursor()
This function creates a visible cursor. The cursor is a horizontal line placed below the next character to be printed to the LCD.
The function lcd.noCursor() turns the cursor off. lcd.cursor() and lcd.noCursor() can be used together in the void loop() section to make a blinking cursor similar to what you see in many text input fields:
#include <LiquidCrystal.h>

LiquidCrystal lcd(12, 11, 5, 4, 3, 2);

void setup() {
  lcd.begin(16, 2);
  lcd.print("hello, world!");
}

void loop() {
  lcd.cursor();
  delay(500);
  lcd.noCursor();
  delay(500);
}
This places a blinking cursor after the exclamation point in “hello, world!”
Cursors can be placed anywhere on the screen with the lcd.setCursor() function. This code places a blinking cursor directly below the exclamation point in “hello, world!”:
#include <LiquidCrystal.h>

LiquidCrystal lcd(12, 11, 5, 4, 3, 2);

void setup() {
  lcd.begin(16, 2);
  lcd.print("hello, world!");
}

void loop() {
  lcd.setCursor(12, 1);
  lcd.cursor();
  delay(500);
  lcd.setCursor(12, 1);
  lcd.noCursor();
  delay(500);
}
lcd.blink()
This function creates a block style cursor that blinks on and off at approximately 500 milliseconds per cycle. Use it in the void loop() section. The function lcd.noBlink() disables the blinking block cursor.
lcd.display()
This function turns on any text or cursors that have been printed to the LCD screen. The function lcd.noDisplay() turns off any text or cursors printed to the LCD, without clearing it from the LCD’s memory.
These two functions can be used together in the void loop() section to create a blinking text effect. This code will make the “hello, world!” text blink on and off:
#include <LiquidCrystal.h>

LiquidCrystal lcd(12, 11, 5, 4, 3, 2);

void setup() {
  lcd.begin(16, 2);
  lcd.print("hello, world!");
}

void loop() {
  lcd.display();
  delay(500);
  lcd.noDisplay();
  delay(500);
}
lcd.scrollDisplayLeft()
This function takes anything printed to the LCD and moves it to the left. It should be used in the void loop() section with a delay command following it. The function will move the text 40 spaces to the left before it loops back to the first character. This code moves the “hello, world!” text to the left, at a rate of one second per character:
#include <LiquidCrystal.h>

LiquidCrystal lcd(12, 11, 5, 4, 3, 2);

void setup() {
  lcd.begin(16, 2);
  lcd.print("hello, world!");
}

void loop() {
  lcd.scrollDisplayLeft();
  delay(1000);
}
Text strings longer than 40 spaces will be printed to line 1 after the 40th position, while the start of the string will continue printing to line 0.
lcd.scrollDisplayRight()
This function behaves like lcd.scrollDisplayLeft(), but moves the text to the right.
lcd.autoscroll()
This function takes a string of text and scrolls it from right to left in increments of the character count of the string. For example, if you have a string of text that is 3 characters long, it will shift the text 3 spaces to the left with each step:
#include <LiquidCrystal.h>

LiquidCrystal lcd(12, 11, 5, 4, 3, 2);

void setup() {
  lcd.begin(16, 2);
}

void loop() {
  lcd.setCursor(0, 0);
  lcd.autoscroll();
  lcd.print("ABC");
  delay(500);
}
Like the lcd.scrollDisplay() functions, the text can be up to 40 characters in length before repeating. At first glance, this function seems less useful than the lcd.scrollDisplay() functions, but it can be very useful for creating animations with custom characters.
lcd.noAutoscroll()
lcd.noAutoscroll() turns the lcd.autoscroll() function off. Use this function before or after lcd.autoscroll() in the void loop() section to create sequences of scrolling text or animations.
lcd.rightToLeft()
This function sets the direction that text is printed to the screen. The default mode is from left to right using the command lcd.leftToRight(), but you may find some cases where it’s useful to output text in the reverse direction:
#include <LiquidCrystal.h>

LiquidCrystal lcd(12, 11, 5, 4, 3, 2);

void setup() {
  lcd.begin(16, 2);
  lcd.setCursor(12, 0);
  lcd.rightToLeft();
  lcd.print("hello, world!");
}

void loop() {
}
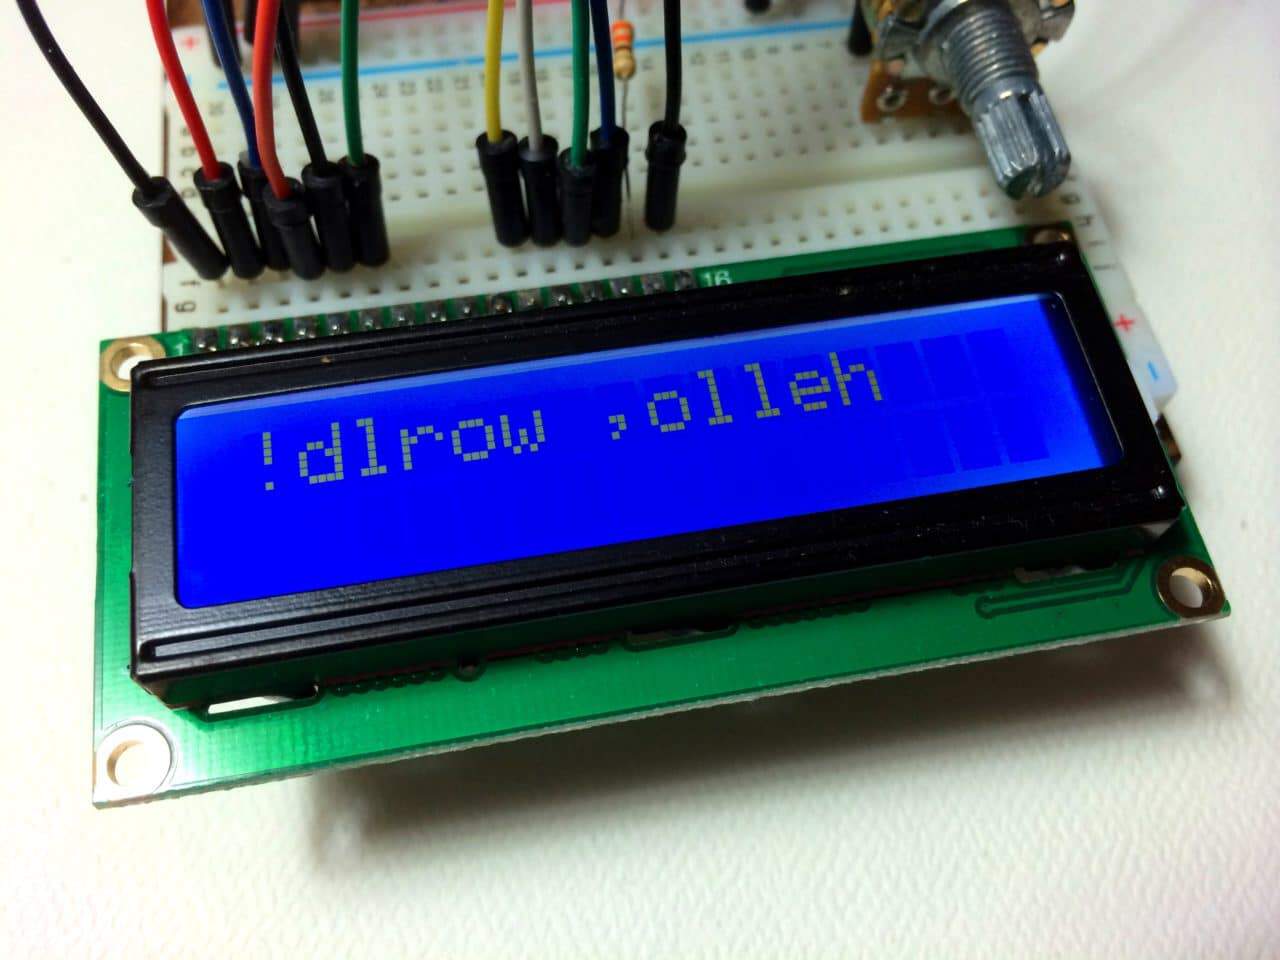
This code prints the “hello, world!” text as “!dlrow ,olleh”. Unless you specify the placement of the cursor with lcd.setCursor(), the text will print from the (0, 1) position and only the first character of the string will be visible.
lcd.createChar()
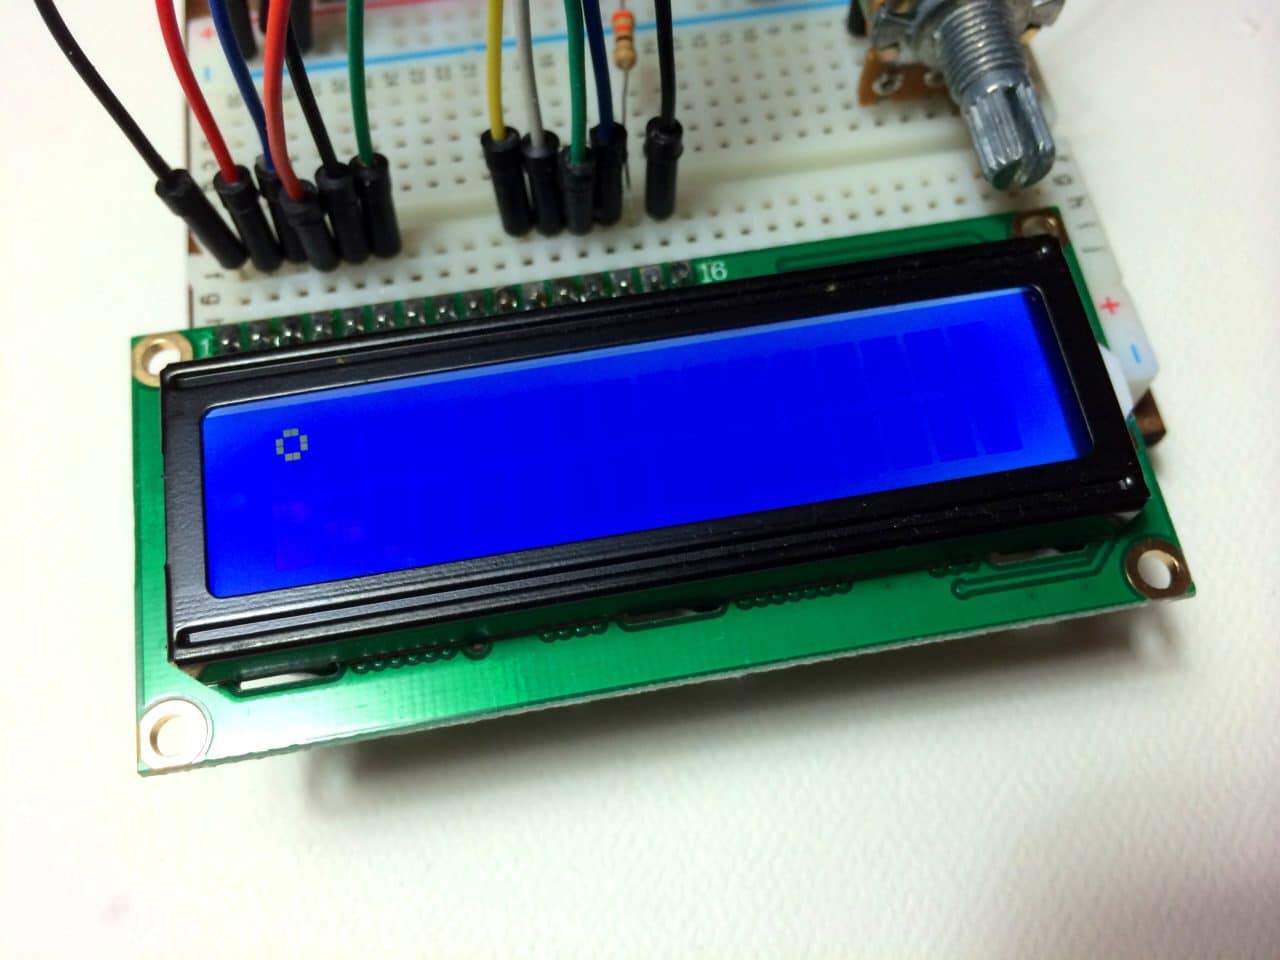
This command allows you to create your own custom characters. Each character of a 16×2 LCD has a 5 pixel width and an 8 pixel height. Up to 8 different custom characters can be defined in a single program. To design your own characters, you’ll need to make a binary matrix of your custom character from an LCD character generator or map it yourself. This code creates a degree symbol (°):
#include <LiquidCrystal.h>

LiquidCrystal lcd(12, 11, 5, 4, 3, 2);
byte customChar[8] = {
	0b00110,
	0b01001,
	0b01001,
	0b00110,
	0b00000,
	0b00000,
	0b00000,
	0b00000
};

void setup() {
  lcd.createChar(0, customChar);
  lcd.begin(16, 2);
  lcd.write((uint8_t)0);
}

void loop() {
}
There are a lot of cool things you can make happen with these 16×2 LCDs! Try combining some of these functions and see what happens.
Here’s a video version of this tutorial so you can see what each function does on the LCD in real time:
If you found this article useful, subscribe via email to get notified when we publish of new posts! And as always, if you are having trouble with anything, just leave a comment and I’ll try to help you out.



how do I make two custom characters?
#include
LiquidCrystal lcd(8, 9, 4, 5, 6, 7);
byte customChar[8] = {
0b00000,
0b00000,
0b11011,
0b10101,
0b10001,
0b01010,
0b00100,
0b00000
};
byte customChar1[8] = {
0b01110,
0b01110,
0b00100,
0b01110,
0b10101,
0b00100,
0b00100,
0b01010
};
byte customChar2[8] = {
0b00000,
0b01110,
0b10001,
0b10101,
0b10001,
0b01110,
0b00000,
0b00000
};
byte customChar3[8] = {
0b00100,
0b00000,
0b01110,
0b10001,
0b10001,
0b11011,
0b01010,
0b01010
};
void setup()
{
lcd.createChar(1, customChar);
lcd.createChar(2, customChar1);
lcd.createChar(3, customChar2);
lcd.createChar(4, customChar3);
lcd.begin(16, 2);
lcd.setCursor(15,0);
lcd.write(1);
lcd.setCursor(13,0);
lcd.write(2);
lcd.setCursor(11,0);
lcd.write(3);
lcd.setCursor(9,0);
lcd.write(4);
}
void loop() {
}
i don’t understand it more imfo plz
I hear your post and I’ll raise one other.
This topic was discussed in Arduino forums. Specifically the forum post, in 2012, talked about how lcd.print() and lcd.write() functions are different. In fact, without going into too much detail, the print function evetually calls the write function.
It’s nice for the hobbyist to tinker. It allows the learning process to grow. So, while I was reading the post, participants replied with differing ideas. One poster tried making the characters move in animation. Copying and pasting the code, I believe the poster was having trouble with developing the animation. As it turns out I discovered where he was having the problem. In the loop section of the code the poster didn’t clear the screen to print, or write, the other characters.
The following is the fix to have animated characters on the lcd.
#include
// initialize the library
LiquidCrystal lcd(12, 11, 5, 4, 3, 2);
byte heart[8] = { // 1
0b00000,
0b00000,
0b01010,
0b11111,
0b11111,
0b01110,
0b00100,
0b00000
};
byte smiley[8] = { // 2
0b00000,
0b00000,
0b01010,
0b00000,
0b00000,
0b10001,
0b01110,
0b00000
};
byte frownie[8] = { // 3
0b00000,
0b00000,
0b01010,
0b00000,
0b00000,
0b00000,
0b01110,
0b10001
};
byte armsDown[8] = { // 4
0b00100,
0b01010,
0b00100,
0b00100,
0b01110,
0b10101,
0b00100,
0b01010
};
byte armsUp[8] = { // 5
0b00100,
0b01010,
0b00100,
0b10101,
0b01110,
0b00100,
0b00100,
0b01010
};
void setup()
{
lcd.createChar(1, heart);
lcd.createChar(2, smiley);
lcd.createChar(3, frownie);
lcd.createChar(4, armsDown);
lcd.createChar(5, armsUp);
lcd.begin(16, 2);
lcd.setCursor(3, 0);
lcd.write(1);
lcd.print(” Arduino “);
lcd.write(2);
lcd.setCursor(4, 1);
lcd.print(“Animation”);
delay(5000);
}
void loop()
{
delay(500);
lcd.clear();
lcd.setCursor(4, 1);
lcd.write(5);
lcd.setCursor(13, 0);
lcd.write(3);
delay(500);
lcd.clear();
lcd.setCursor(4, 1);
lcd.write(4);
lcd.setCursor(13, 0);
lcd.write(2);
}
nevermind I just found out srry
Thank you! I’ve needed detail like this for a while. I have a project for work that I wanted to use my LCD display for, but didn’t know how to use it.
Great! Glad it helped :)
Please, could you post some tips on how to use I2C Lcd displays. Tks
I’m in the process of writing a post about this right now. Will let you know when it’s finished!
My lcd is just showing boxes
l dont know to fix the problem
pls help me with that
SUPER DANKEEEEEE!!!
Your welcome !!! ::))
How can I print on two lines at once? I figured out how to set the cursor when I need it to begin at a certain point but, now I need two lines. Any help is appreciated.
You can duplicate the lcd.setCursor and lcd.print functions like below, one for each line. They can be used in the setup section or the loop section:
#include
LiquidCrystal lcd(12, 11, 5, 4, 3, 2);
void setup() {
lcd.begin(16, 2);
lcd.setCursor(0, 0);
lcd.print(“Line 1”);
lcd.setCursor(0, 1);
lcd.print(“Line 2”);
}
Sorry, the first line should say # include LiquidCrystal…..
This is an awesome tutorial. Thanks for sharing it. :)
yo! How can you display a data log output in LCD that is too many that a 16×2 cant handle?
Could you clear (lcd.clear) the screen after a certain number of values have been printed to it? Maybe clear it after each value is printed? The scroll function only works for under 40 characters before it loops back on itself…
great another tutorial on using 16×2 displays. How about one for 16×4? There aren’t many of those on the web
This tutorial should work with a 16×4 LCD (as long as it uses the Hitachi HD44780 driver). Just set the screen dimensions with the function lcd.begin(16, 4)…
I like this tutorial alot, there is just one problem, for some reason, when i connect my lcd screen, it blinks off and on, and sometimes it doesen’t even make a light, and then the 5v and ground pins start smoking and melting the plastic, i really need some help on this, please e-mail me if you can.
There is definitely a short somewhere. Not all LCDs have the same pin out. Check the datasheet for yours, or see if the pins are labeled on the PCB. I’ll update the diagram in the post so you can see the pin labels
a short circuit maybe, it happened once with me in a USB 3 port
Thanks a lot..!! It’s a great tutorial.
I am quite new to this,never used LCD and arduino before.
I want that one text should be displayed on LCD when I send ‘1’ as serial data to arduino and display some other text if I send ‘2’ as serial data.But when I put Serial.begin(),some strange characters are displayed on LCD.I know the problem is with Serial.begin.
I tried it,but it displays both texts simultaneously .
I would be extremely thankful if I can get some useful suggestions to solve my problem.
Thanks in advance!
If you’re getting strange characters on the display it could be that the baud rate of your serial monitor is different that what’s in your program. You can either change the baud rate of your serial monitor, or you can change the code. In the setup section you can add Serial.begin(9600), or what ever baud rate you want to use. Hope that helps
Hye…can anyone help me…i need to make the LCD displaying 4 different text when 4 different button are press…
if button1 press then LCD display text A
if button2 press then LCD display text B
and so on…can anyone help me with the connection and the code…i spent 4 days trying to understand it but seems i cant understand it…im too newbie in Arduino world…
My screen turns on but I can’t get words to show.
Hi Jake, I would double check to make sure everything is connected properly, and that the connections match the pins in the diagram. On some LCDs the pins are arranged differently. If that doesn’t work, it could be that the screen contrast is set too low…
Thanks
lcd.print(seconds+0x30) is for?
I cannot display the words…but the LCD was on…why?
Have you tried adjusting the screen contrast? If that’s not it, make sure the connections are right for your LCD. The RS pin should connect to Arduino pin 12, and the E pin should connect to Arduino pin 11..
i cannot work for “hello, world!”
Are you getting anything to display on the screen?
I hope you make more great tutorials!
hello
Tnx very much on all the information . it was very helpful
does some one have a load-cell code ???
i am looking for reading on a LCD data which comes from a load-cell (conecting to HX711)
how can i restore the data (weight scale)and take him and use him
Can you send me the theoretical circuit diagram for this kind of connection??
I’m using an elegoo board, which should be the same as an arduino board but its not allowing me to write things it just fills up all of the pixels on the first row. What version of Arduino should I use? I am on windows, should I use an older version?
What kind of backwards language puts the exclamation point at the beginning of a sentence?
sir can you gibe me code for push button down counter from 500 to 000 manual button pressed and countdown should star again from 500 . when count down reached to 000 reset to 500. how to write butter pressed count down display please.
hello, how about to write codes on OLED 7pins? I’m doing on a project like that. It will be a big help if you reply me. thank you also for this LCD.
can you name the apparatus once again
Hi, can i get the full program for display the current time as well as the number of taken food parallel with the fixed time?
hello. how can i print speed of a dc motor on this lcd using arduino and encoder?
Hey, can we control individual pixels? I’m trying to use this as a spectrum analyzer and would need more resolution than only 2 rows :/ Thanks!!
Ola,
when I try to import DHTLib.zip in my Arduino Create I get this message:
Libraries that could not be imported:
[] [Lb+T/b/m] 400 invalid_request: attribute “name” of response is missing and required, attribute: name, parent: response
Any ideas why?
Hello, Nice explained and it is true that with this simple Lcd 2×16 there is a lot of funy and interesting possibilities for creating animated or expressive message or value of sensors. With 4×20, than the possibilities increases but optimisation of simplicity is for me the best and nicesest way to print outvjust what is necesary in clear style.
Just a comment regarding the lcd.print() function:
If you use, for example lcd.print(xxx.yyyyy,3);
the LCD will display xxx.yyy . In other words the 3 tells how many digits to display following the decimal point. I have not seen this documented anywhere (perhaps it was and I missed it.)
I discovered this while making a specific gravity meter using a load cell and the HX711 load cell amplifier with a 20 x 4 LCD display and I needed some control over the displayed precision.
re my email address: note that it should be all lower case; your email address field changes it to upper case.
If you want to run one of these LCDs with an ESP8266 type controller that runs on 3.3v, you’ll find that there isn’t enough deltaV between +V and the contrast pin to get a clear display. Biasing it with a negatice voltage will do the trick. I inserted a battery between ground and the “negative” side of the pot and now get good contrast with about -0.9 v on the contrast pin.
BTW, with my Arduino IDE (with 2.3.0 core), I needed 0.1.13 of the DHT lib.
Thanks for the fine tutorial!
dats too good
In the LCD, it is displaying cursor and blinking functions but the text entered in the lcd.print is not being displayed.
hye. example coding piezoelectric display ?
very helpful thanks
Hey I did all of the steps in the video and I don’t know why but my lcd wont turn on and i followed EVERY step just please help me I want to do this project.
hello. I was replicating the project but when I uploaded the program the lcd screen would just light up but not display anything. I did all the wiring but i do not have that odd looking piece, pls tell me if it has anything ot do with that or if I did something else wrong
This is so awesome! Thank you!!
I Will try di Coding Programming, Thanks Man
will this connection work even for atmega4809
?*
Do you need a battery?